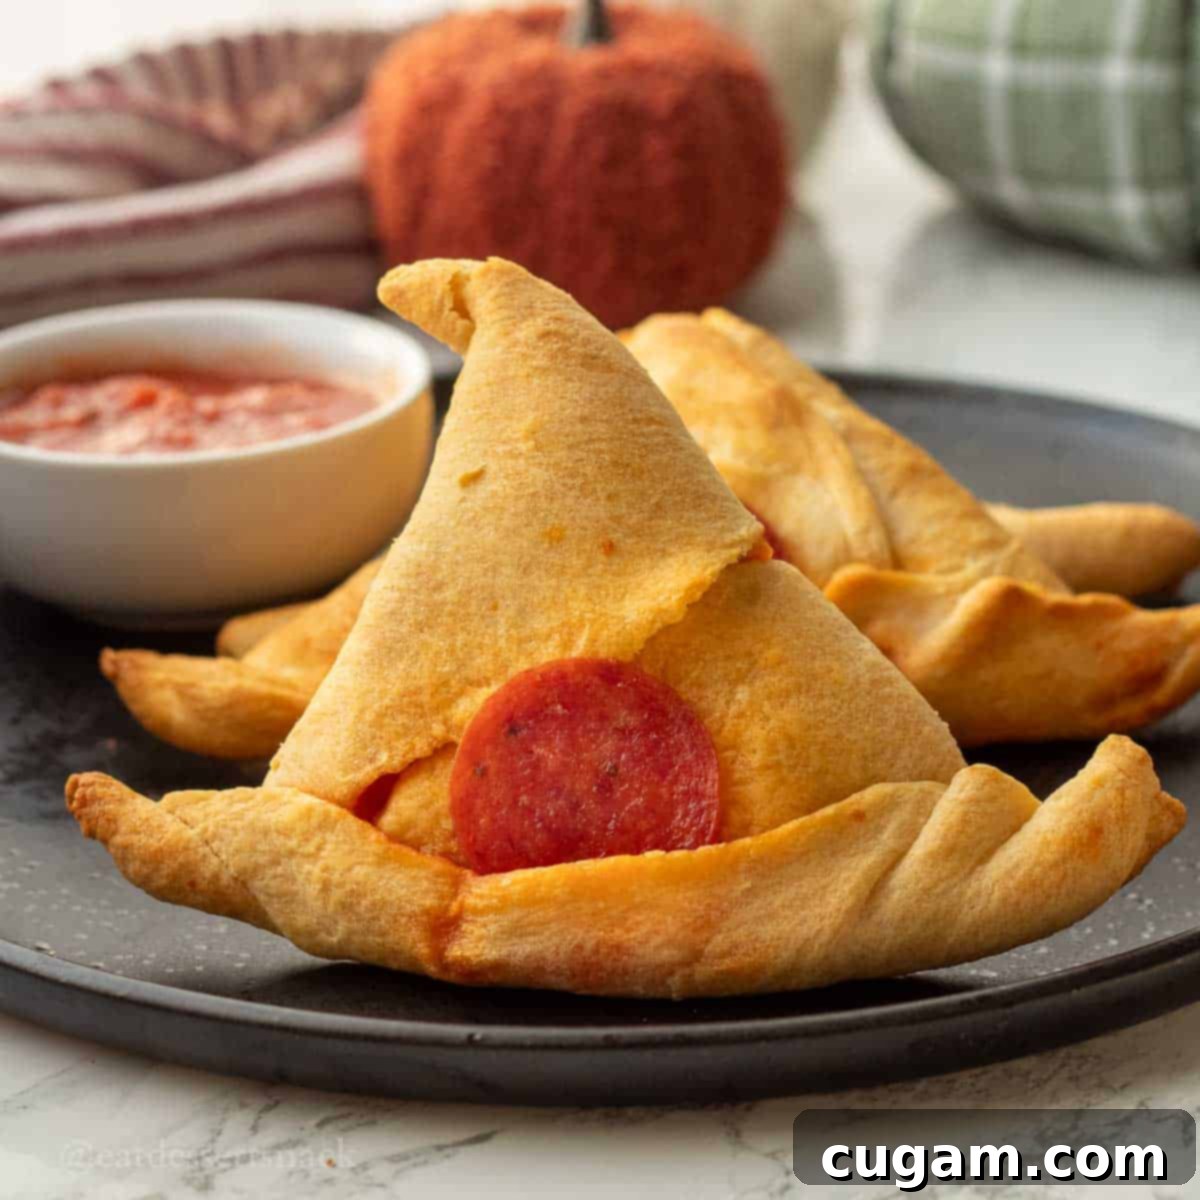
Spooky & Savory Witch Hat Crescent Rolls: The Ultimate Halloween Party Appetizer
Witch Hat Crescent Rolls are an absolutely enchanting and incredibly easy Halloween party food, bursting with classic pizza flavors like gooey mozzarella cheese, zesty pizza sauce, and savory pepperoni. This recipe offers a delightfully fun and engaging way for kids and adults alike to participate in creating a memorable Halloween dinner or appetizer. Imagine the smiles as little ghouls and goblins help craft their very own spooky snacks before heading out for trick-or-treating!
These delightful Witch Hat Pizza Crescent Rolls are not only a feast for the eyes but also a blessing for busy Halloween hosts. They boast an astonishingly quick preparation time of just 10 minutes to assemble and a mere 15 minutes to bake! We adore making these magical treats throughout the entire week leading up to Halloween, perfect for school parties, neighborhood gatherings, or as a quick, mess-free dinner on Halloween night itself. This ensures the kids can enjoy a delicious, festive meal without worrying about spills on their costumes, leaving them ready to rush out and collect their sugary treasures.

Beyond being a fantastic main course, these spooky pizza crescent rolls also serve as a spectacular appetizer idea for any Halloween celebration. We especially love pairing them with themed desserts like Halloween Graveyard Pudding Cups, creating a truly immersive and delicious spread that will leave your guests screaming for more!
Why You’ll Adore This Halloween Recipe
Preparing for Halloween can be hectic, but your party food doesn’t have to be! These Witch Hat Crescent Rolls are designed to bring maximum festive fun with minimal effort. Here’s why this recipe will become a cherished part of your annual Halloween traditions:
- Irresistible Taste: Each bite delivers the comforting and familiar flavors of a classic mini pizza. The warm, soft crescent dough encases gooey, melted mozzarella cheese, tangy pizza sauce, and savory pepperoni, creating a harmonious blend that appeals to all ages. It’s the perfect savory treat to fuel up before a night of spooky adventures.
- Remarkable Ease: This recipe is incredibly beginner-friendly, requiring only basic culinary skills and some simple assembly. It’s an ideal project for getting children involved in the kitchen, making it a wonderful activity for a Halloween afternoon. Kids will love shaping the dough into whimsical witch hats, sprinkling cheese, and arranging pepperoni. The steps are straightforward, ensuring a stress-free cooking experience even amidst Halloween festivities.
- Unbeatable Time Efficiency: Time is of the essence during the Halloween season, and this recipe delivers! With just 10 minutes of active prep time and 15 minutes in the oven, you can whip up a batch of these enchanting treats in less than half an hour. This rapid turnaround makes them perfect for last-minute party additions, a quick pre-trick-or-treat dinner, or an effortless snack for unexpected guests.
🛒 Essential Ingredients for Spooky Crescent Rolls
Crafting these adorable and delicious witch hats requires just a few simple ingredients, many of which you likely already have on hand. Quality ingredients ensure the best flavor, but convenience is also key for Halloween baking!
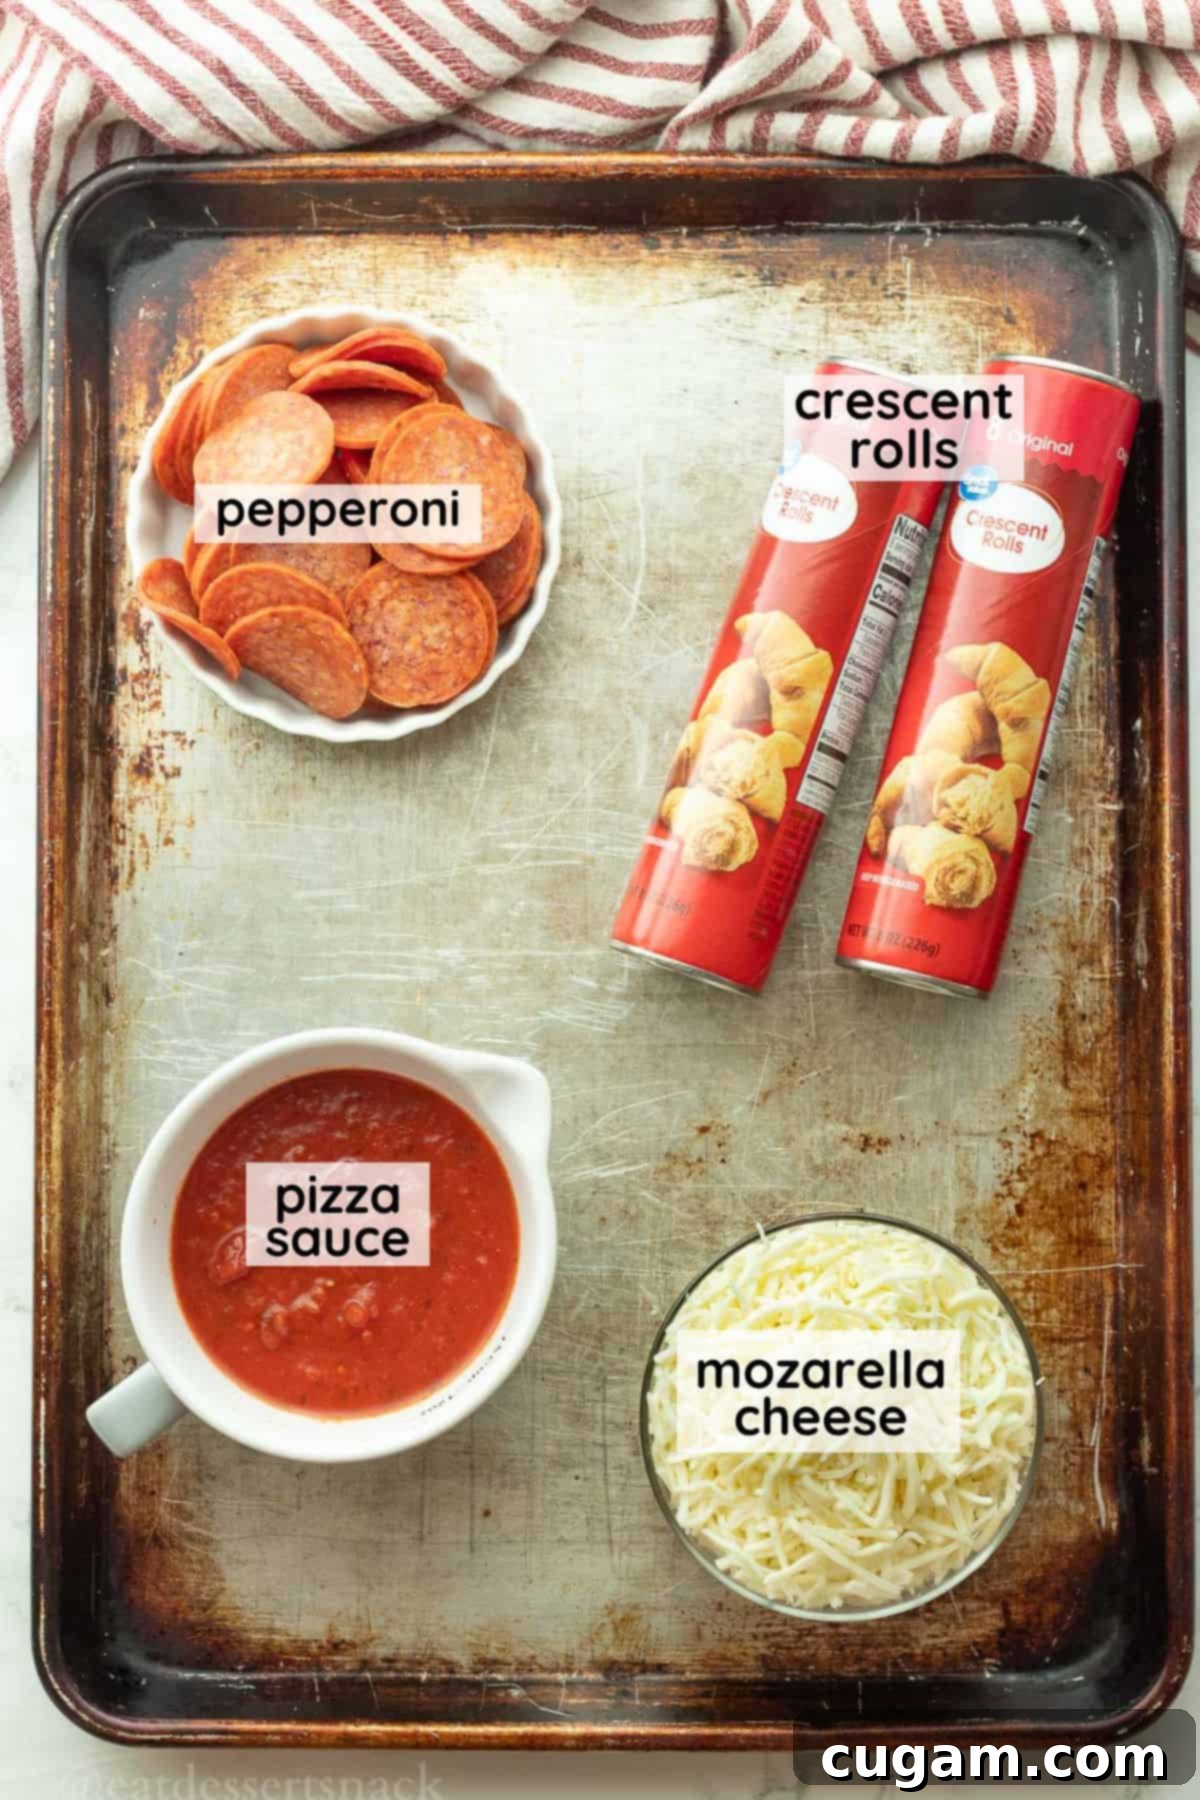
- Pizza Sauce – The foundation of that classic pizza taste! You can opt for a high-quality store-bought pizza sauce to keep prep time to an absolute minimum, or for an extra layer of flavor and control over ingredients, try our Easy Homemade Pizza Sauce (made from tomato paste). A rich, slightly sweet, and savory sauce is crucial.
- Crescent Rolls – The star of the show! Any brand of store-bought refrigerated crescent roll dough will work wonderfully. We specifically chose crescent rolls for this recipe because their triangular shape makes them incredibly easy to manipulate and form into the iconic witch hat silhouette. While other biscuit doughs can be used, crescent rolls offer the perfect blend of flakiness and pliability.
- Cheese – Mozzarella is the traditional and most popular choice for pizza for a reason – it melts beautifully, creating that irresistible stringy, gooey texture we all love. However, don’t be afraid to experiment! For a more sophisticated flavor, consider shredded gouda, gruyere, or colby jack cheese. A blend of mozzarella and a sharper cheese can also add depth.
- Pepperoni – These savory, slightly spicy discs are essential for adding that classic pizza punch and also play a role in the witch hat’s brim. Standard pepperoni slices work, but if you can find mini pepperonis, they can be even easier to tuck into the smaller hats.
For a precise list of ingredients and quantities, please refer to the comprehensive recipe card located at the bottom of this article.
✏️ Creative Substitutions & Flavorful Variations
One of the best things about these Witch Hat Crescent Rolls is their versatility! While the classic pizza flavor is a guaranteed crowd-pleaser, you can easily adapt this recipe to suit different tastes or occasions. Get creative and make these spooky snacks truly your own!
- Embrace Your Sweet Side! Transform these savory hats into a delightful dessert. Instead of pizza sauce, spread a generous layer of Nutella, peanut butter, or cookie butter. Fill with mini marshmallows and chocolate chips. After baking and cooling, decorate them with a whimsical drizzle of melted chocolate or colorful frosting, then top with festive sprinkles for an extra touch of magic. These are fantastic for a Halloween dessert platter!
- Try a Hearty Chicken Bacon Ranch version for a flavorful twist. Use cooked, shredded chicken and crispy bacon bits as your filling. Replace the pizza sauce with a creamy Ranch dressing or a homemade ranch seasoning mixed with cream cheese for a truly satisfying savory option. This variation offers a completely different, yet equally delicious, flavor profile. Yum!
- Spice things up with a Zesty & Spicy Option! For those who love a little heat, swap the pizza sauce for a flavored cream cheese spread, or our vibrant tomatillo cilantro dressing. Add finely diced jalapeños, pickled pepperoncinis, or a dash of red pepper flakes along with your cheese and pepperoni for a fiery kick that’s sure to awaken the taste buds.
- Vegetarian Delight: Easily make these vegetarian by omitting the pepperoni. Instead, fill them with sautéed mushrooms, bell peppers, black olives, spinach, or even a spoonful of pesto for added flavor.
- Breakfast Witch Hats: Why limit the fun to dinner? Fill the crescent rolls with scrambled eggs, a sprinkle of cheese, and cooked crumbled sausage or bacon bits for a fun Halloween breakfast or brunch treat!
🧑🍳 Step-by-Step Instructions to Create Your Witch Hat Crescent Rolls
Follow these simple steps to bring your spooky witch hat appetizers to life. Precision in shaping will make all the difference in achieving that iconic Halloween look!
First, preheat your oven to 375 ℉ (190°C). Prepare two baking trays by lining them with parchment paper or silicone mats. This will prevent sticking and make cleanup a breeze.
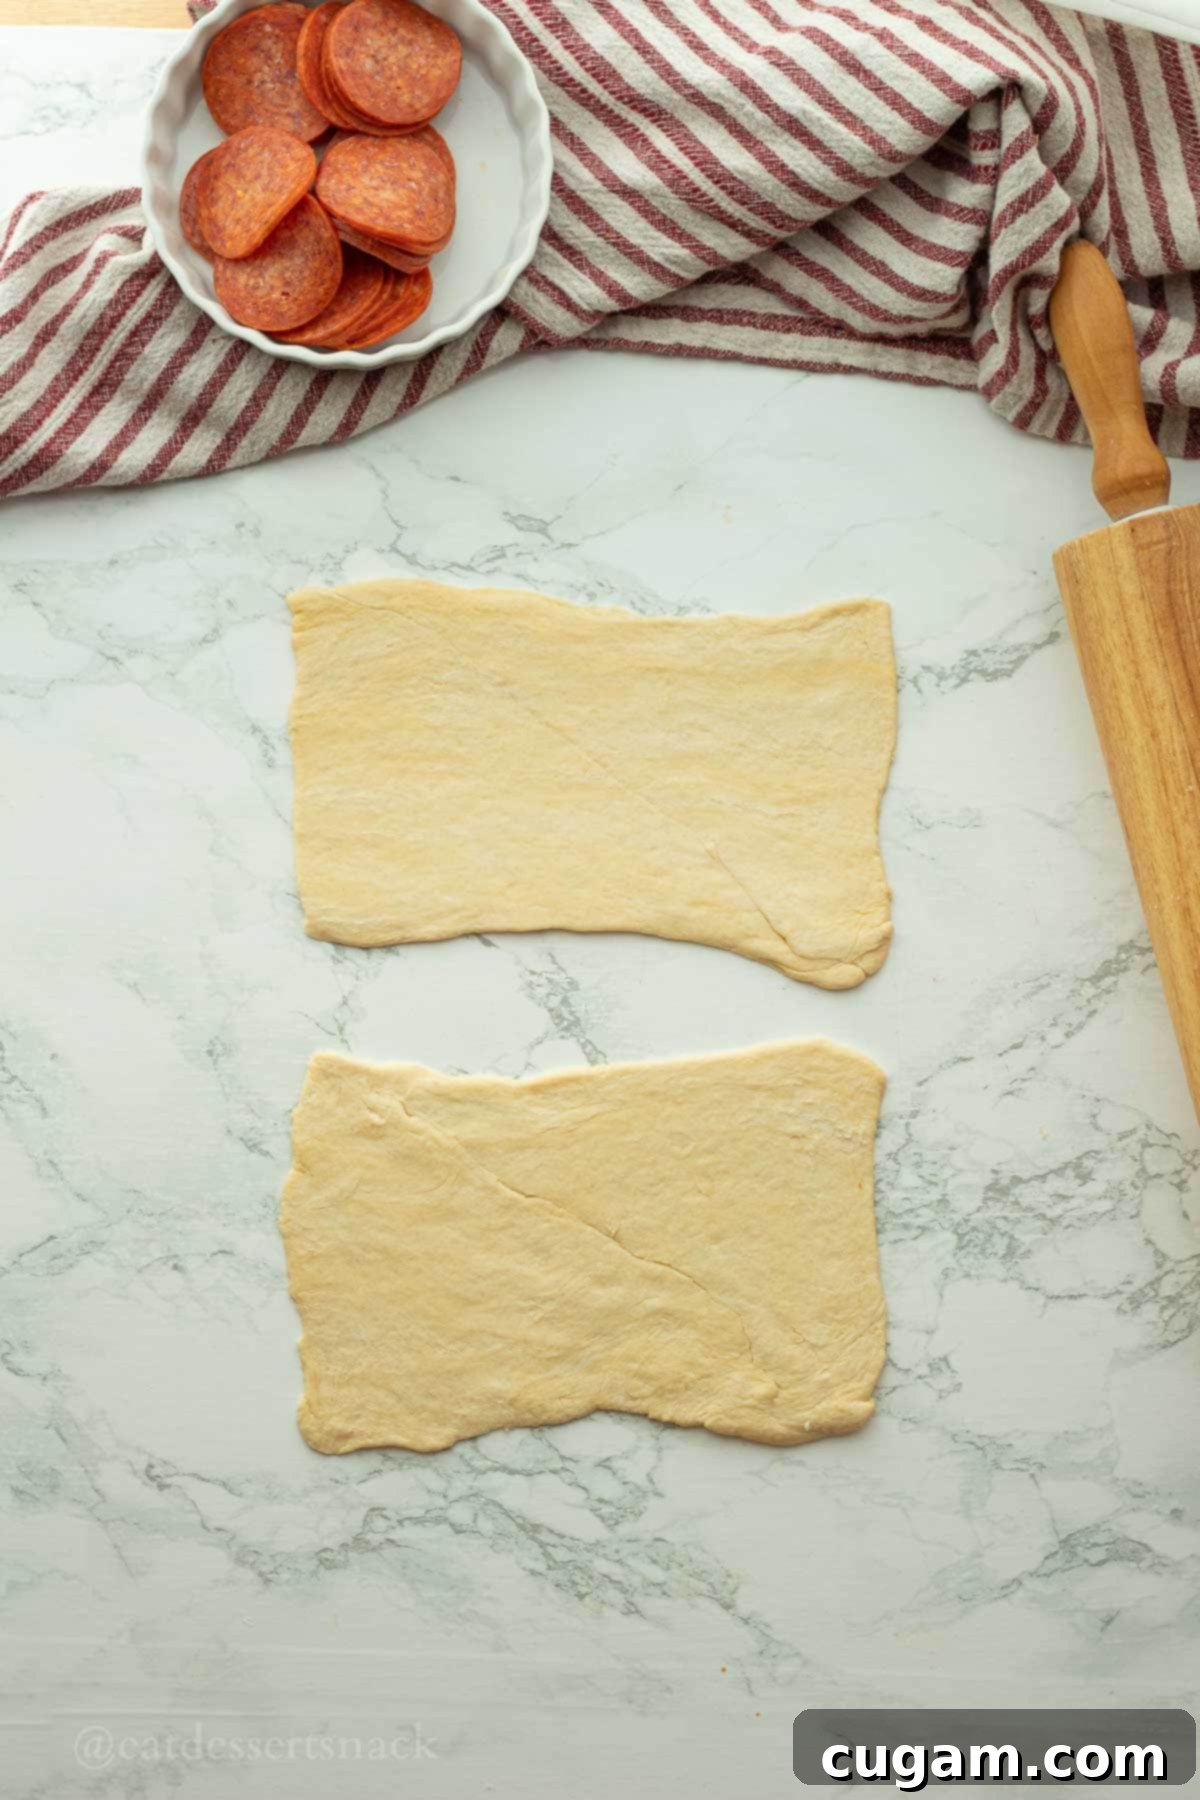
- Step 1. Carefully separate the crescent roll dough into rectangles. Each rectangle is typically formed by two triangular rolls pressed together at their seam. Gently roll each rectangle out with a rolling pin on a lightly floured surface. Aim for a flat, even rectangle, ensuring there are no gaps or thin spots in the middle. This creates a sturdy base for your filling and shaping.
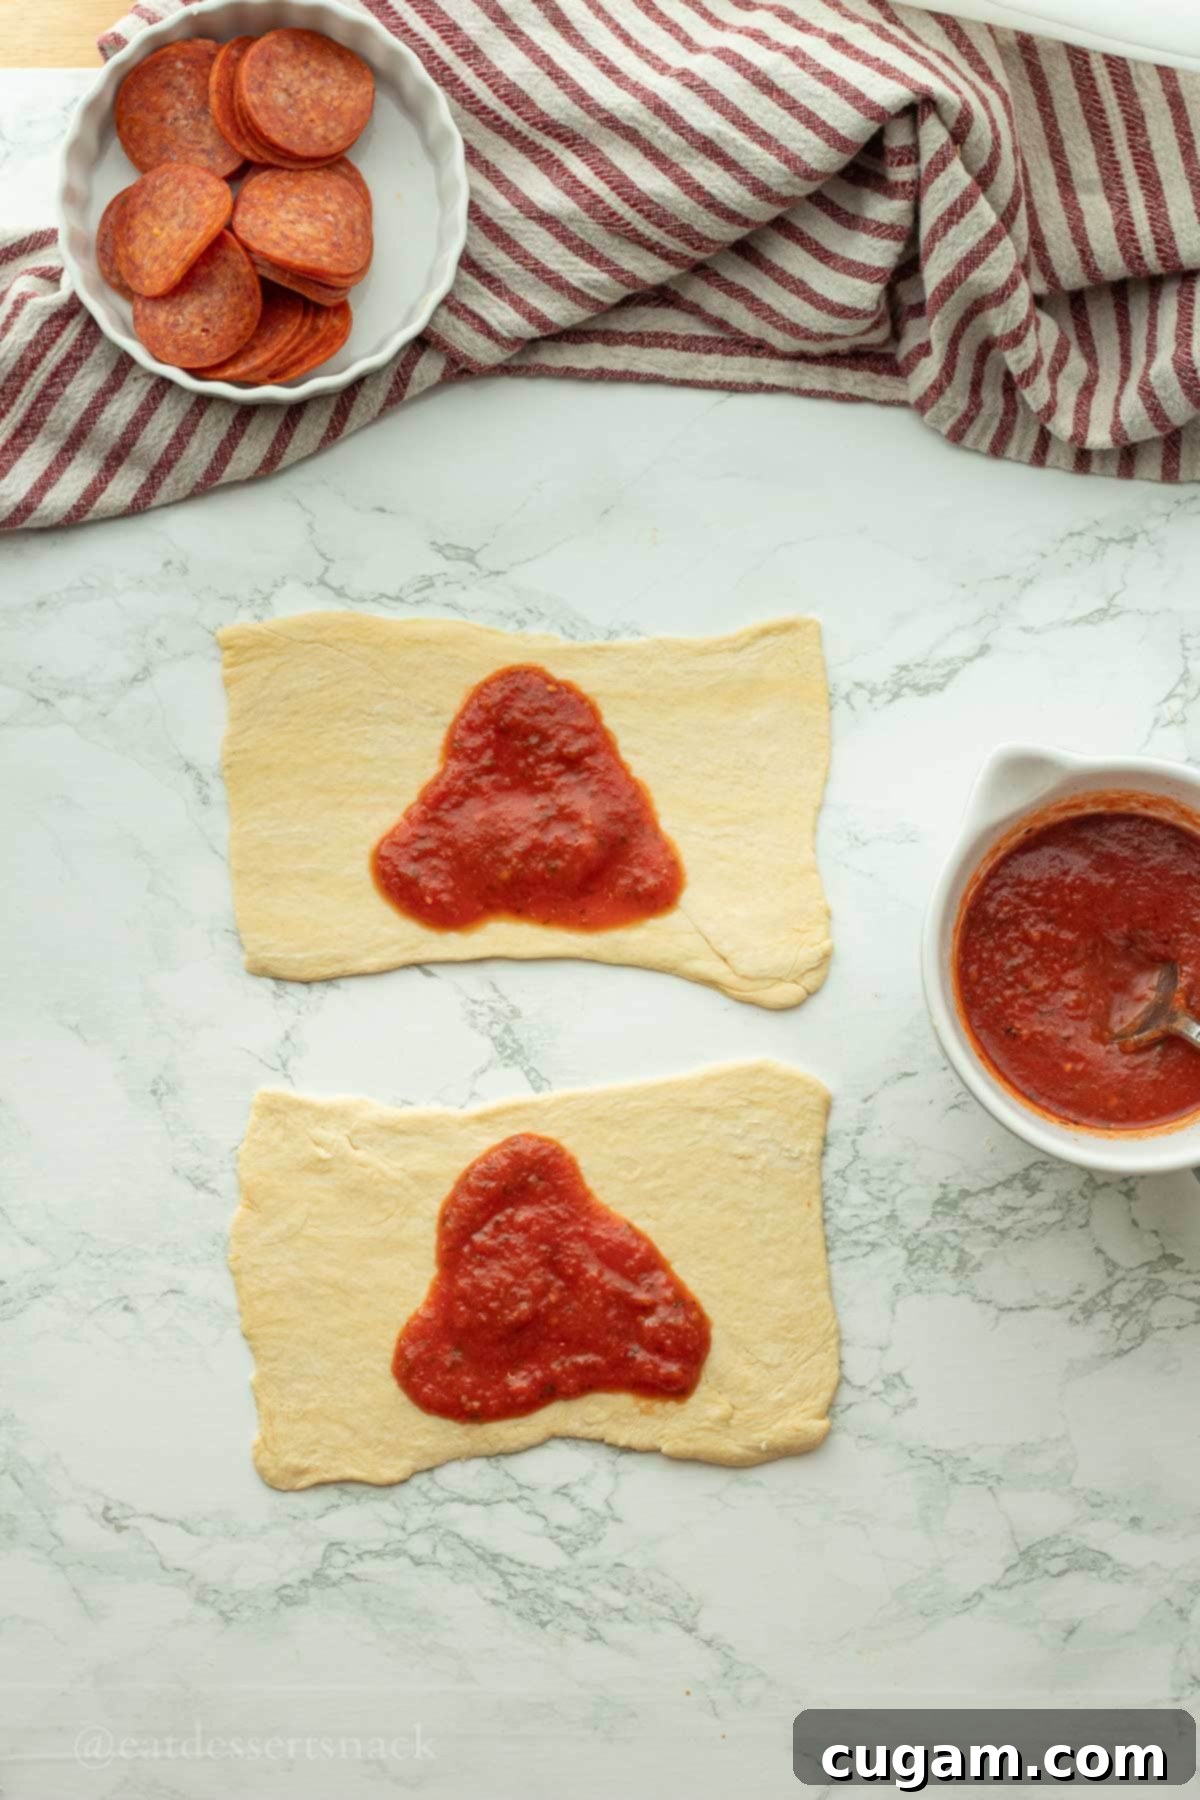
- Step 2. Using a spoon, spread a generous spoonful or two of pizza sauce onto the middle of each dough rectangle. The key is to create a distinct triangle shape with the sauce, leaving a border around the edges. This triangular base will guide the shape of your witch hat.
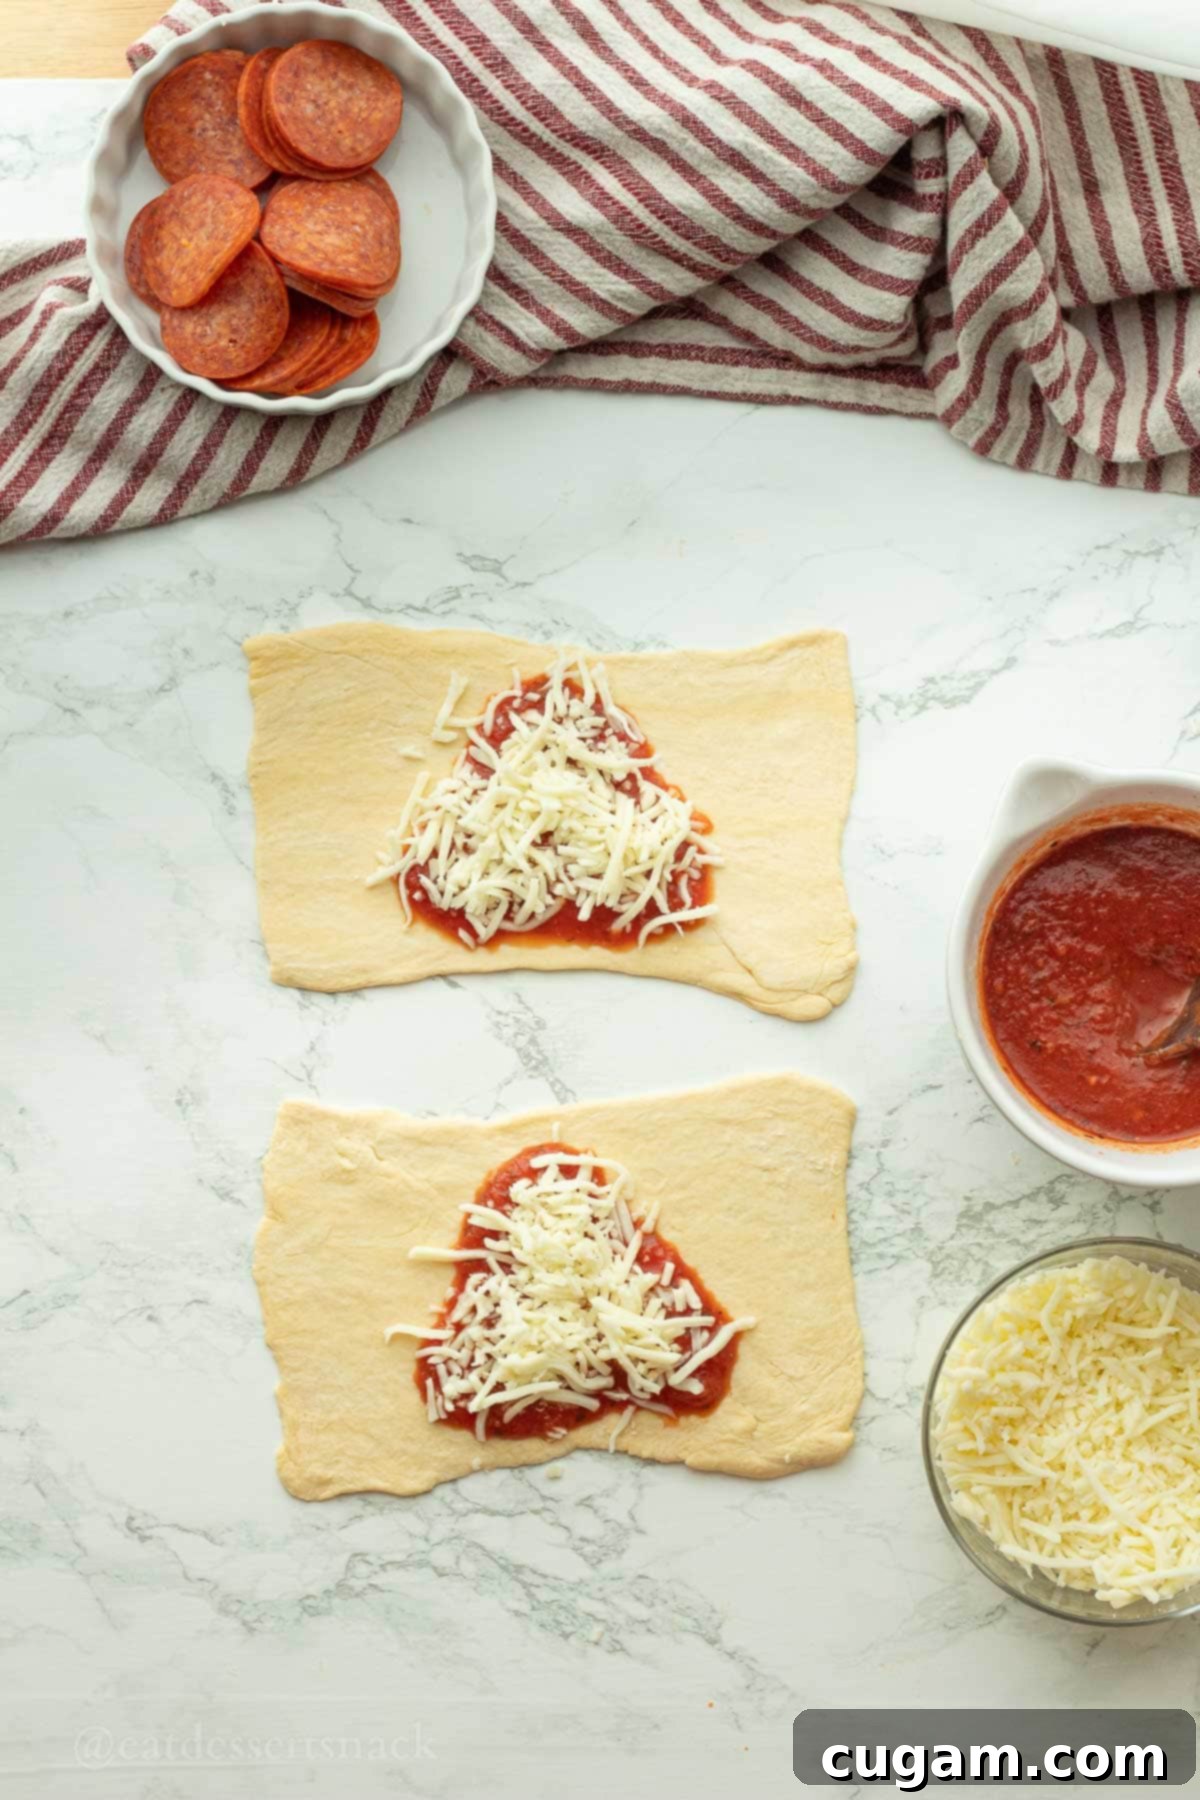
- Step 3. Evenly sprinkle a good amount of shredded mozzarella cheese (or your chosen blend) over the pizza sauce triangle. Ensure the cheese stays within the sauce’s borders to prevent excessive melting and oozing during baking, which could affect the hat’s shape.
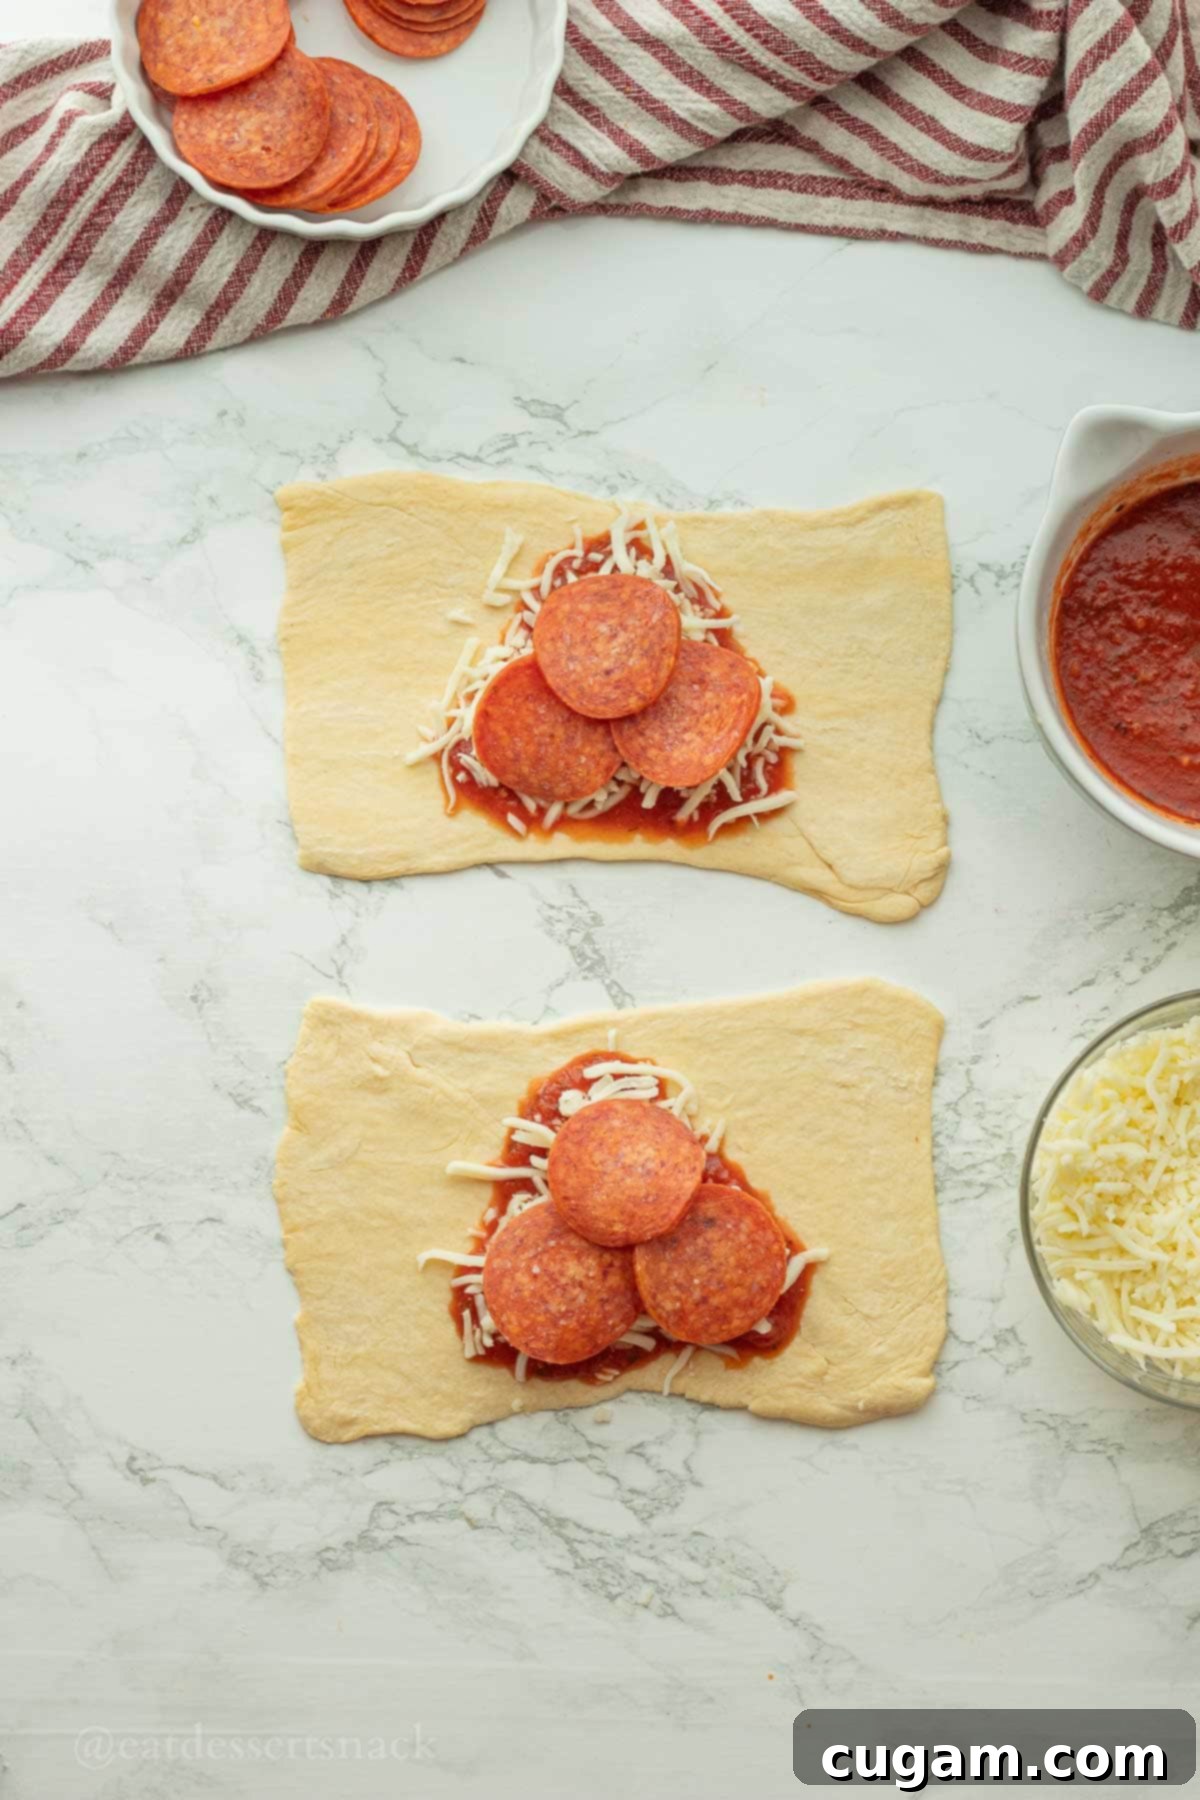
- Step 4. Arrange 3 pepperoni slices tightly together over the cheese. Overlapping them slightly is best, as this helps create a more substantial filling that will hold its shape within the hat. Place them towards the narrower end of the sauce triangle.
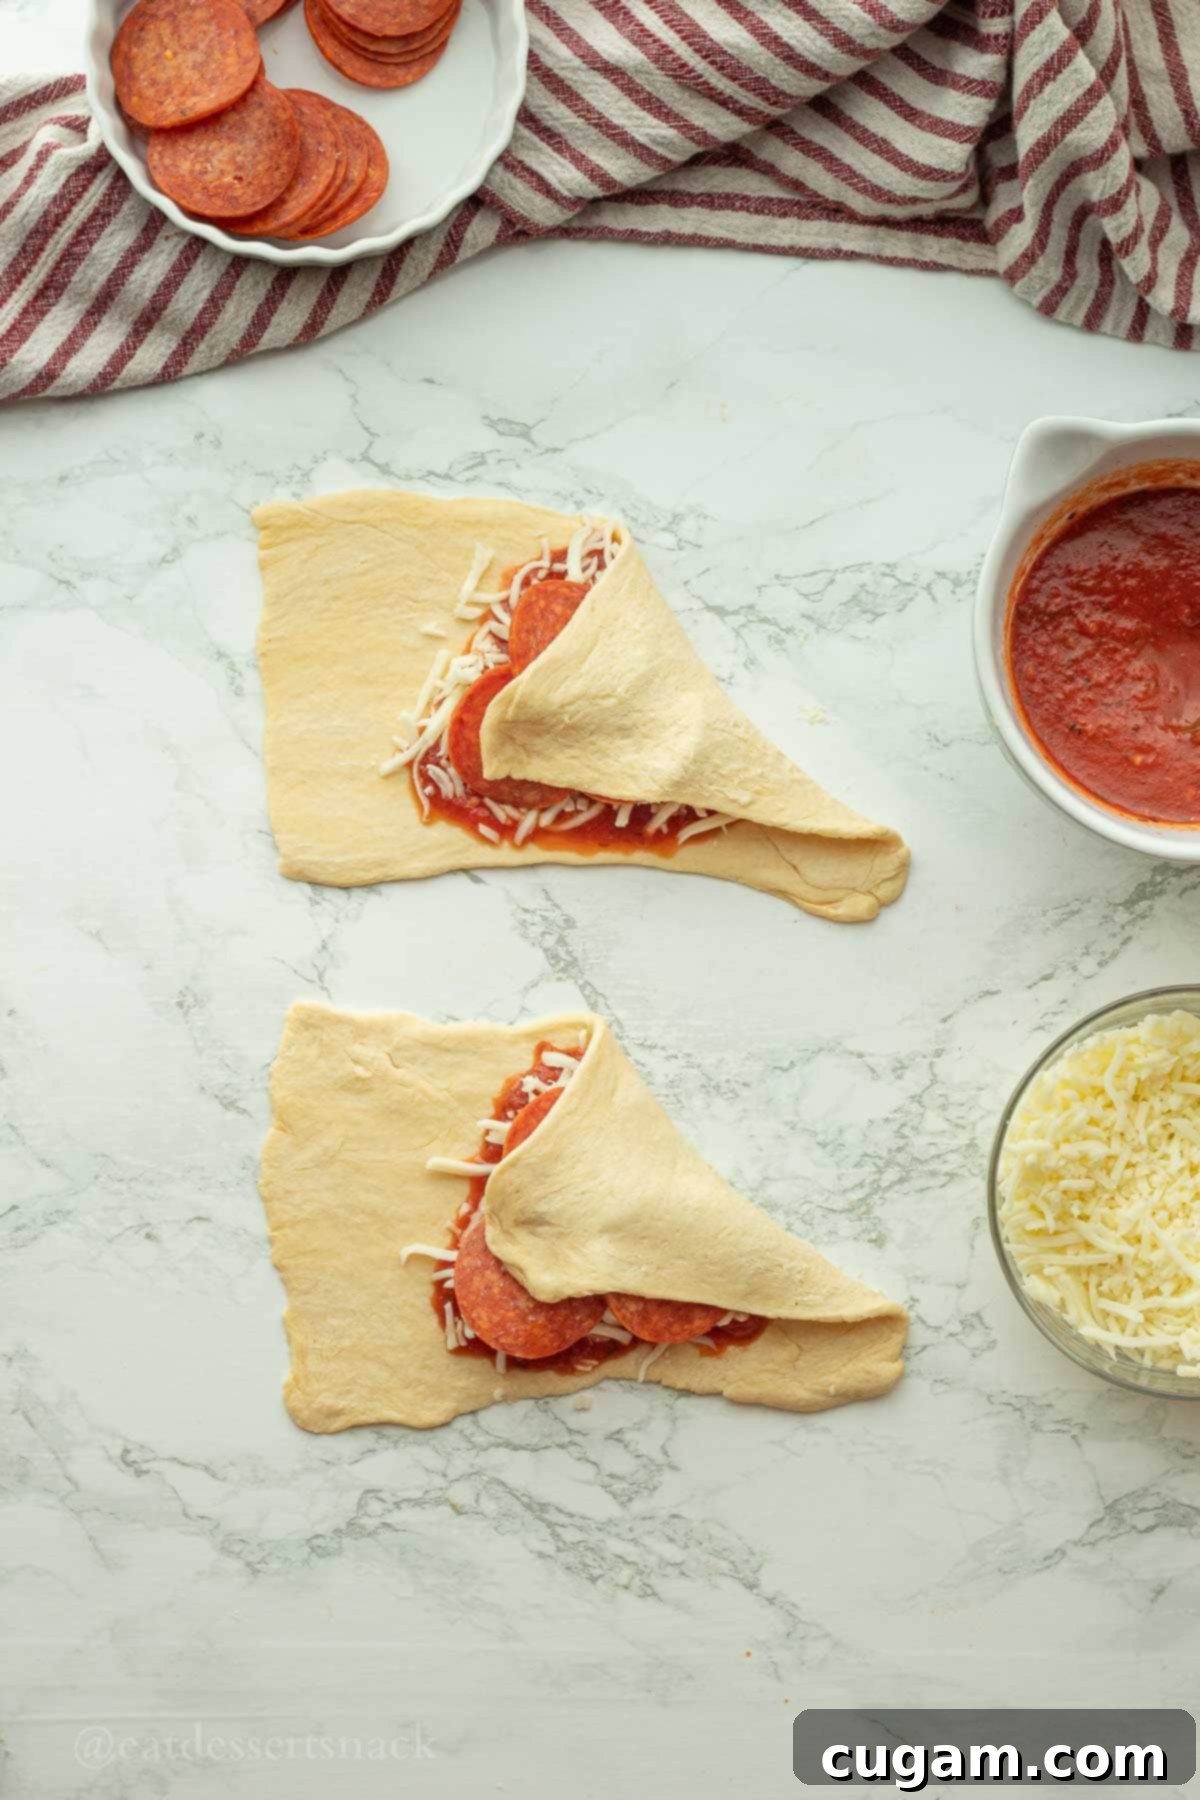
- Step 5. To begin shaping the hat, start at the top right corner of the dough rectangle. Fold this corner diagonally over the filling, aiming towards the bottom left corner. Ensure the fold completely covers the pepperoni and cheese, forming the initial conical shape of the witch hat. Gently press down the edges to seal.
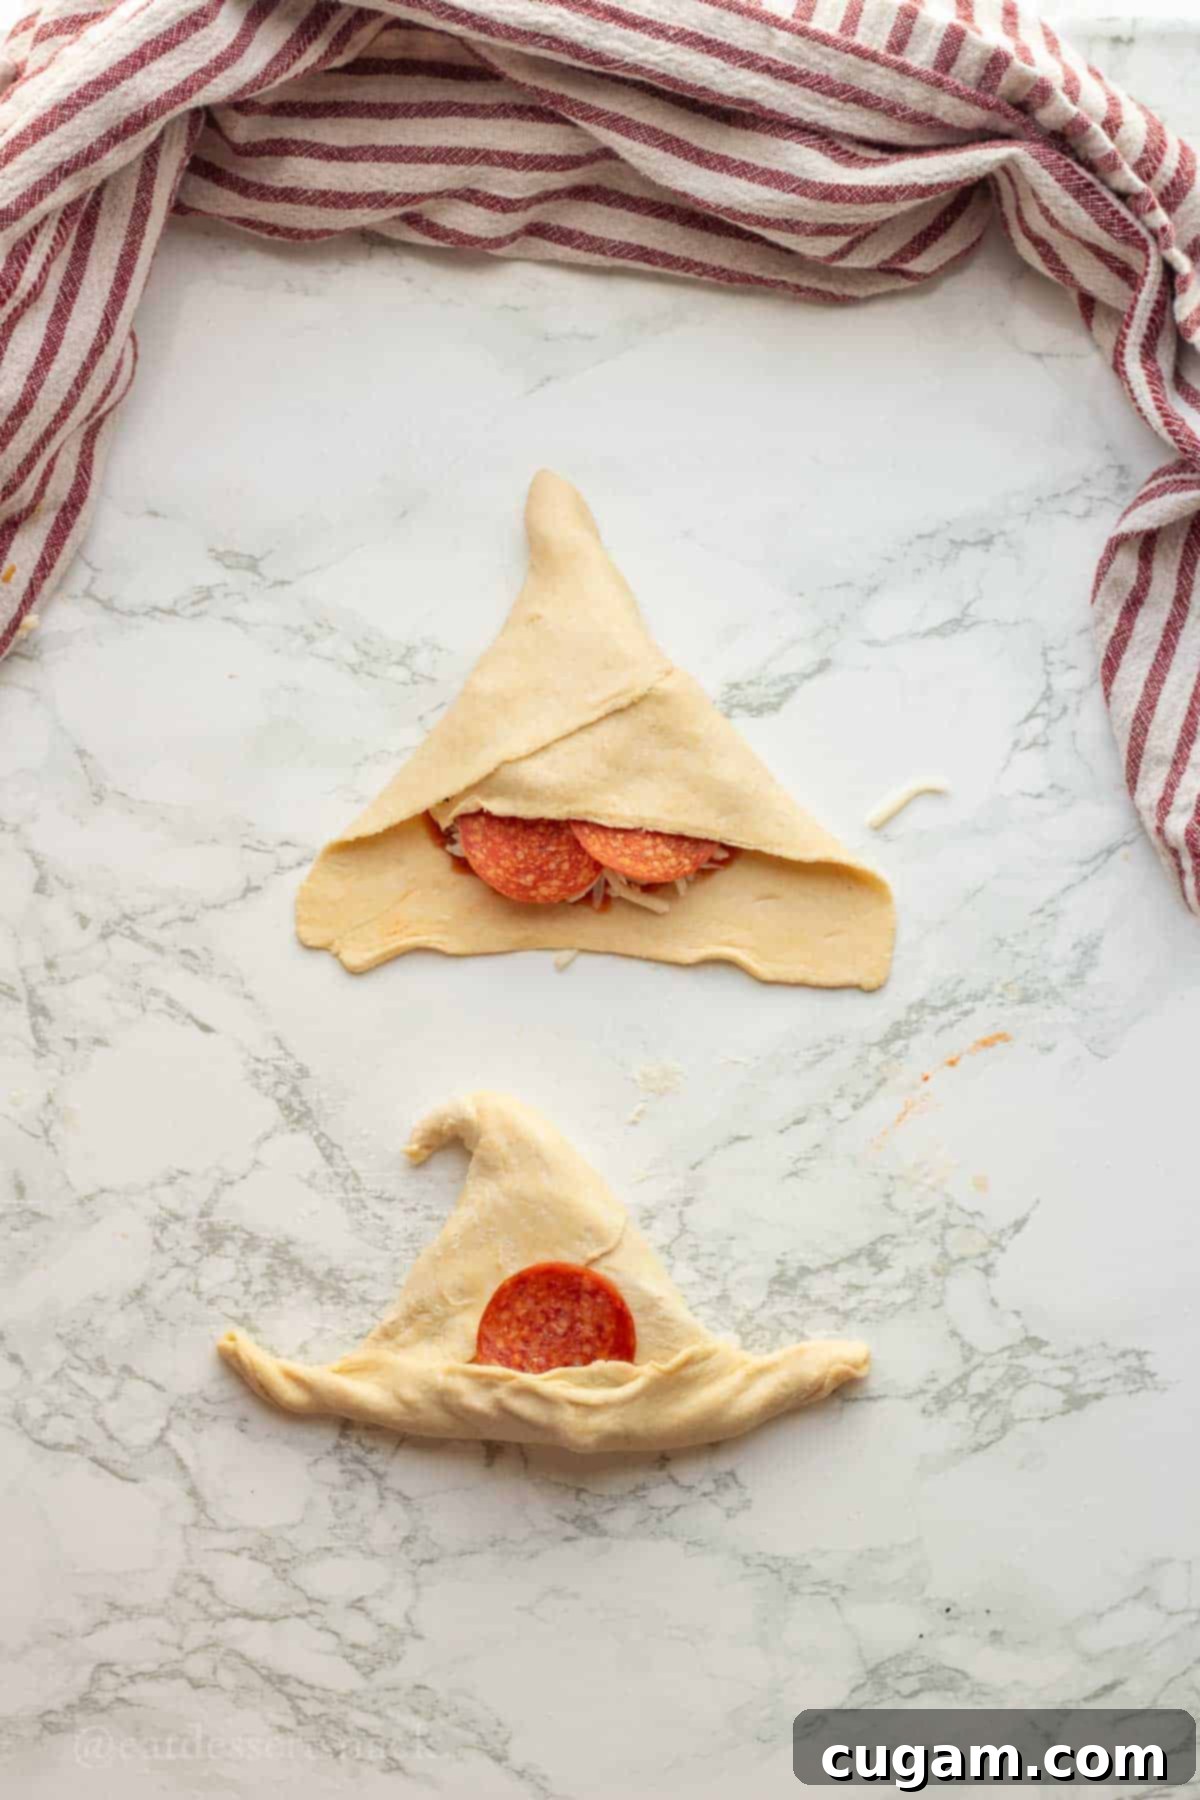
- Step 6. Now, take the top left corner of the dough that remains exposed. Fold this corner ACROSS the newly formed triangle, wrapping it around the right edge. This crucial step helps to elongate the hat, making it taller and more pointed, achieving a more visually appealing and less “squatty” witch hat appearance. Press firmly to seal the seams.
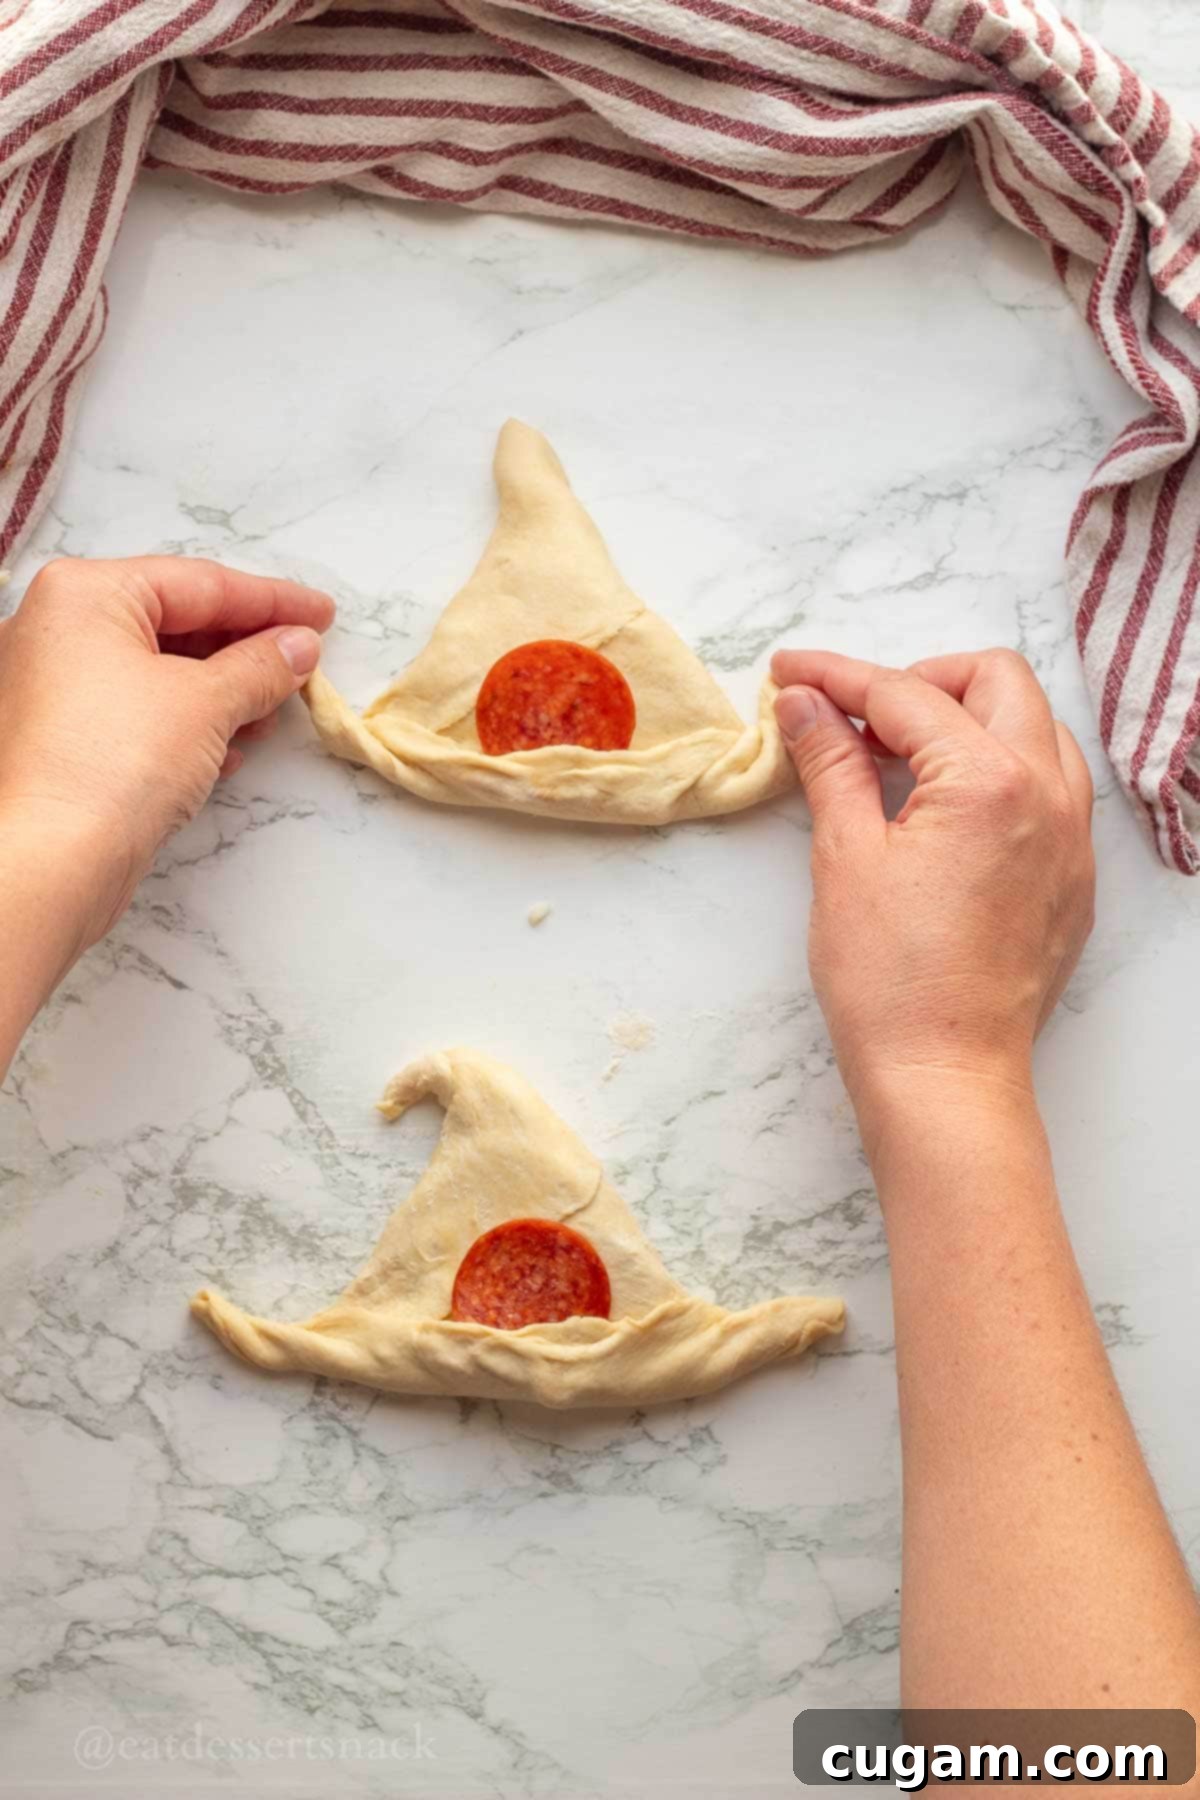
- Step 7. To create the iconic brim, flip the bottom edge of the roll upwards by about 1 inch. This creates a distinct, slightly curled edge. For an extra touch of realism and flavor, tuck a single pepperoni slice into this brim. Finally, gently curve the very top of the dough triangle downward slightly, and curl the two bottom corners of the brim upwards to mimic the classic floppy edges of a witch’s hat. Take your time to shape them, as this adds to their charm!
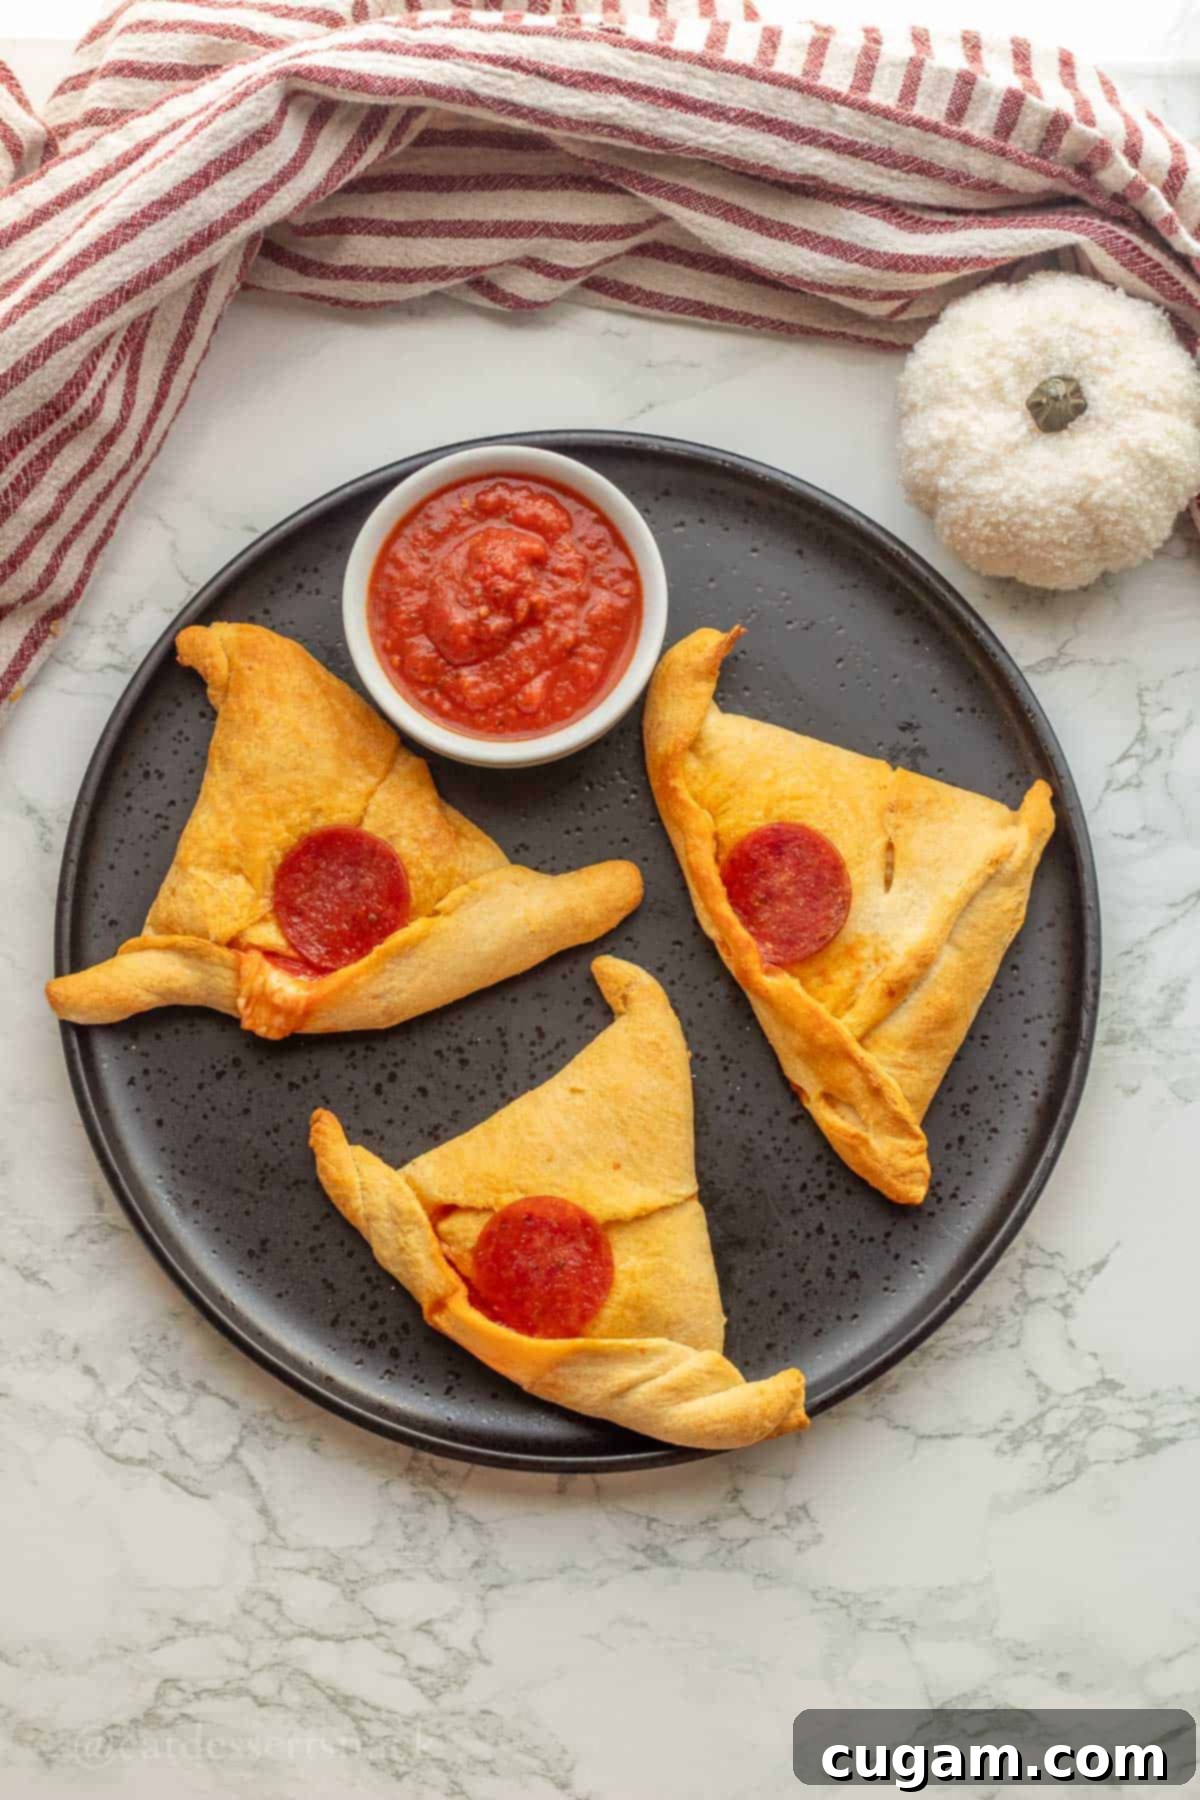
- Step 8. Carefully transfer your perfectly shaped witch hat crescent rolls to the prepared baking pans, leaving a little space between each. Bake for approximately 15 minutes, or until the dough is beautifully golden brown and the cheese is bubbly and melted. Once baked, serve them warm with extra pizza sauce for dipping, allowing everyone to enjoy their personalized spooky snacks!
❄️ Make Ahead, Storage, and Freezing Advice
Halloween prep can be a whirlwind, but these witch hat crescent rolls are designed to be flexible. Here’s how you can prepare them in advance and store leftovers efficiently:
Make Ahead: For ultimate convenience, you can assemble the uncooked rolls up to 24 hours before baking. Simply follow all the instruction steps, shaping the hats and placing them on a parchment-lined baking sheet. Cover the entire sheet loosely with plastic wrap and refrigerate. When ready to bake, remove them from the fridge about 15-20 minutes beforehand to allow them to come closer to room temperature, then bake as directed. This is perfect for party day prep!
Refrigerate Leftovers: If you happen to have any witch hats left over (a rare occurrence!), allow them to cool completely to room temperature. Store them in an airtight container or a zip-top bag in the refrigerator for 2-3 days. Proper storage helps maintain their freshness and prevents them from drying out.
Reheating for Best Results: To bring your cooled witch hats back to life, place them on a baking sheet and warm them in a preheated oven at 300°F (150°C) for 5-7 minutes, or until heated through and the cheese is re-melted. For a quicker option, a microwave can be used, but the dough won’t be as crispy.
Pro Tip: Always reheat your witch hat crescent rolls in the oven or a toaster oven rather than the microwave. This method ensures the dough becomes deliciously crispy again, mimicking that fresh-baked texture, while the microwave can often leave them soft and less appealing.
Freezing (Cooked or Uncooked): For long-term storage, these witch hats can be frozen!
- Uncooked: Assemble the rolls as directed, then arrange them on a baking sheet without touching. Freeze until solid (about 2-3 hours). Once frozen, transfer them to an airtight freezer-safe bag or container. They can be stored for up to 1-2 months. When ready to bake, place frozen hats on a parchment-lined baking sheet and bake at 375°F (190°C) for an extended time, usually 20-25 minutes, or until golden brown. No need to thaw!
- Cooked: Allow baked and cooled witch hats to freeze individually on a baking sheet. Once solid, transfer to a freezer bag or container. They will keep for up to 1 month. Reheat from frozen in a 350°F (175°C) oven for 15-20 minutes, or until heated through.
❓Frequently Asked Questions About Witch Hat Crescent Rolls
The key to preventing your witch hats from unrolling is to ensure the seams are tightly pinched and sealed during assembly. After folding and shaping, gently but firmly press all the edges together. For extra security, you can lightly brush the edges with an egg wash (one egg beaten with a tablespoon of water) before baking. The egg wash acts as a glue, helping the dough adhere and creating a beautiful golden-brown crust.
Absolutely! These crescent rolls are fantastic for making ahead. You have a few options: you can assemble the rolls completely and refrigerate them, covered, for up to 24 hours before baking. Alternatively, you can bake them fully, let them cool, and then refrigerate for 2-3 days or even freeze them for longer storage (up to a month). Reheat baked rolls in the oven for best results before serving.
For a truly magical witch hat appearance, pay close attention to the shaping in Step 7. Gently curve the tip of the hat downward and curl the two bottom corners of the brim upwards before baking. After cooling, you can add extra decorative touches. For savory hats, use a thin brush to “paint” details with extra pizza sauce or balsamic glaze, or stick small olive slices onto the brim as a “buckle.” For sweet versions, chocolate frosting and sprinkles can create intricate designs. A small piece of bell pepper or a tiny olive can also be used as a “buckle” on the brim.
Any standard refrigerated crescent roll dough from your local grocery store will work wonderfully for this recipe. Brands like Pillsbury are commonly used and reliable. The key is their distinct triangular shape, which makes them ideal for forming the witch hats. Ensure the dough is fresh and not expired for the best rise and flakiness.
Serving Suggestions for a Spooktacular Halloween
These Witch Hat Crescent Rolls are a versatile and delicious addition to any Halloween spread. Here are some ideas to make them even more festive and enjoyable:
- Dipping Delight: While pizza sauce is a classic accompaniment, don’t limit yourself! Offer a variety of dipping sauces such as warm marinara, creamy ranch dressing, garlic butter, or even a spicy sriracha mayo for those who enjoy a kick.
- Festive Beverages: Pair these savory treats with seasonal drinks. Serve with Apple Cider Punch, a mug of warm hot cocoa, or a vibrant pumpkin punch to complete the autumnal atmosphere.
- Themed Presentation: Arrange the witch hats on a Halloween-themed platter. Think black and orange serving dishes, spooky spiderweb placemats, or even a bed of “fog” created with dry ice (handled carefully and safely) for an extra dramatic effect.
- Sweet and Savory Duo: If you try a sweet version with Nutella, peanut butter, or cookie butter (as suggested in the variations), create a separate dessert plate for them. This allows guests to enjoy both savory and sweet witch hats! Let me know in the comments how your sweet creations turn out – I’d love to hear about your unique flavor combinations!
- Complete Meal: Serve them alongside a warm bowl of Creamy Pumpkin Soup or a refreshing green salad with a spooky twist (like black olive “spiders”) to create a balanced and exciting Halloween meal.
🎃 More Fun Halloween Recipes You’ll Love!
Planning a full Halloween feast? Don’t stop at these delightful Witch Hat Crescent Rolls! Explore these other fantastic and easy recipes to make your spooky celebrations truly unforgettable. From creepy crawly cookies to ghoulish dips, we’ve got your Halloween menu covered:
- Spider Web Cookies
- Halloween Graveyard Pudding Cups
- Pumpkin Cream Cheese Dip
- Halloween Spider Web Taco Dip
Did you try this enchanting recipe? I’m always thrilled to hear about your culinary adventures! Make sure to leave a ⭐️ star rating and a comment below the recipe card to share your experience. Your feedback is incredibly helpful to other readers and truly brightens my day!
📲 FOLLOW Sara on Social Media! 👋 For the latest delicious recipes, behind-the-scenes glimpses, and everyday snack inspirations, find me on Facebook, Instagram, or Pinterest. Join our community and never miss a treat!
📝 Printable Recipe: Easy Witch Hat Crescent Rolls

Easy Witch Hat Crescent Rolls (Halloween Treats)
Pin Recipe
Ingredients
- 2 cans Crescent Rolls (18 rolls total, forming 9 rectangles)
- 1 cup pizza sauce (or your favorite brand)
- 1 cup shredded mozzarella cheese (or a pizza cheese blend)
- 24 pepperoni slices (standard or mini)
Instructions
-
Preheat oven to 375 ℉ (190°C). Line two baking trays with parchment paper or silicone mats.Separate the 2 cans Crescent Rolls into rectangles (each made with 2 triangle rolls pressed together). On a lightly floured surface, roll them out with a rolling pin into flat, even rectangles, ensuring there are no gaps in the middle.
-
Spread 1-2 Tablespoons of pizza sauce in a distinct triangle shape in the middle of each rectangle, leaving a small border around the edges.
-
Evenly sprinkle 1-2 Tablespoons of mozzarella cheese over the pizza sauce, keeping it within the triangle shape.
-
Place 3 pepperoni slices really close together over the cheese, towards the narrower end of the sauce triangle. Overlapping them is best to create a fuller hat.
-
Starting at the top right corner of the dough, fold it diagonally towards the bottom left corner until it completely covers the pepperoni and cheese. Gently press down the edges to seal.
-
Take the top left corner of the folded dough and fold it ACROSS, wrapping it around the right edge of the triangle. This helps to make the hat taller and more pointed. Press firmly to seal all seams.
-
To create the brim of the witch hat, flip the bottom edge of the roll up by about 1 inch.
Optionally, tuck an additional pepperoni slice into the brim. Gently curve the very top of the triangle downward, and the two bottom corners of the brim upwards to resemble the classic shape of a witch’s hat.
-
Carefully transfer the shaped witch hats to your lined baking pans, leaving a little space between each. Bake for 15 minutes, or until the dough is golden brown and the cheese is melted and bubbly.
Serve immediately with extra pizza sauce for dipping!
Notes
Refrigerate Leftovers: Once cooked and cooled to room temperature, store in an airtight container for 2-3 days.
Reheating: For crispy results, warm in a preheated oven at 300°F (150°C) for 5-7 minutes. Microwaving is quicker but may result in softer dough.
Freezing: Unbaked rolls can be frozen individually on a baking sheet, then transferred to a freezer bag for up to 1-2 months. Bake from frozen for 20-25 minutes. Cooked rolls can also be frozen and reheated from frozen in the oven.
Nutrition

Hi, I’m Sara!
A Registered Nurse by day, I transform into a passionate food blogger on weekends. I’m always on the hunt for the perfect dip and the most delightful snack. My ideal day includes short, refreshing walks on the beach and long, luxurious naps. Through Eat Dessert Snack, I love sharing my passion for food, one delicious bite at a time. Join me on this culinary journey!
