How to Make the Best Crispy Greek Saganaki Cheese at Home
Saganaki is more than just a dish; it’s an experience. This iconic Greek appetizer, famous for its golden-crispy exterior and delightfully gooey interior, often leaves a lasting impression, compelling you to order it every time you spot it on a menu. But what if we told you that bringing this incredible taste of Greece into your own kitchen is surprisingly simple? This comprehensive guide will show you exactly how to master the art of Saganaki, using the traditional Kefalograviera cheese and a special, yet easy, technique to achieve that perfect crispy texture right in your skillet. Prepare to impress your family and friends with this irresistible pan-fried Greek cheese, no restaurant required!
This post may contain affiliate links. You can read my disclosure policy HERE.

What is Saganaki? Unveiling the Beloved Greek Appetizer
In Greek cuisine, the term “Saganaki” broadly refers to any dish prepared in a small, two-handled frying pan, also called a ‘sagani’. While there are various “saganaki” dishes, the most celebrated and globally recognized is undoubtedly the pan-fried cheese appetizer. This beloved starter is a staple in Greek tavernas and restaurants worldwide, renowned for its simple yet profound deliciousness. Imagine a thick slice of cheese, sizzling hot, with a perfectly golden and crisp crust yielding to a warm, soft, and stretchy interior. Often, in restaurants, it’s dramatically presented table-side, doused with brandy or ouzo, flambéed with a resounding “Opa!” before being extinguished with a squeeze of fresh lemon juice. This theatrical presentation adds to its allure, making it not just a dish but a memorable culinary experience. It’s truly one of my personal favorite Greek dishes, and its addictive qualities make it a consistent choice for many.
Choosing the Best Cheese for Authentic Saganaki
The secret to an outstanding Saganaki lies primarily in selecting the right cheese. For the most authentic and delectable results, you’ll want a cheese that can withstand high heat without completely melting away, forming a beautiful crust while becoming wonderfully gooey inside. The top contenders for this Greek fried cheese recipe are **Kefalograviera or Graviera**. These semi-hard to hard Greek cheeses are known for their salty, tangy flavor and firm texture, which holds up exceptionally well during frying.
While Kefalograviera is my absolute top recommendation for its robust flavor and ideal texture, other excellent alternatives include **Kasseri or Kefalotyri**. Kasseri offers a slightly milder, buttery flavor, while Kefalotyri is a hard, salty cheese similar to Kefalograviera. Both will give you a delicious fried cheese experience. You might also encounter Saganaki made with Feta cheese. While Feta Saganaki can be tasty, it behaves differently when fried; it tends to crumble and doesn’t achieve the same firm, crispy exterior and gooey interior that Kefalograviera, Graviera, or Kasseri do. For that classic, restaurant-style Saganaki, Kefalograviera truly is the best choice. Look for these cheeses at specialty cheese shops, Mediterranean markets, or larger grocery stores with a good international section.


Mastering the Technique: How to Make Perfect Saganaki Cheese
Achieving that coveted **crispy-on-the-outside and gooey-on-the-inside** texture for your Saganaki cheese is simpler than you might think, thanks to a few key ingredients and a specific, easy-to-follow technique. No special skills are required, just a little attention to detail!
Essential Ingredients for Saganaki:
- Kefalograviera Cheese: The star of the show. A good quality, firm block is essential.
- Olive Oil: Extra virgin olive oil adds rich flavor and is perfect for frying.
- All-Purpose Flour: This creates the crispy coating.
- Water: This might surprise you, but water is actually a critical component! It helps the flour adhere perfectly to the cheese, creating that desirable, evenly golden and crispy crust when fried.
- Fresh Lemon: Indispensable for serving; its acidity cuts through the richness of the cheese and brightens every bite.
Step-by-Step Guide to Crispy Saganaki:
Follow these easy steps to prepare a restaurant-quality Saganaki in your own kitchen:
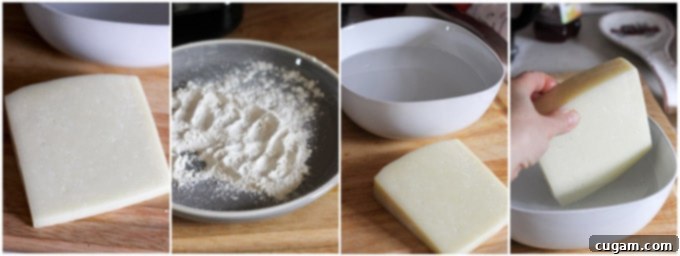
- Prepare Your Workspace: Slice your Kefalograviera cheese into a block, ideally no thicker than 1/2 inch (about 1.25 cm). This thickness ensures even cooking and a perfect balance of crispy crust and melted interior. Set up three stations: your sliced cheese, a bowl filled with about a cup of water, and a plate with about 1/2 cup of all-purpose flour. Having everything ready before you start frying is key to success.
- Heat the Skillet: Place a small skillet on medium-high heat. A small cast iron skillet works best here as it distributes and retains heat very well, leading to a more evenly cooked and crispier cheese. Once hot, add just enough extra virgin olive oil to lightly coat the bottom of the pan – about 1-2 tablespoons. You want enough oil to fry, but not so much that the cheese is deep-fried.
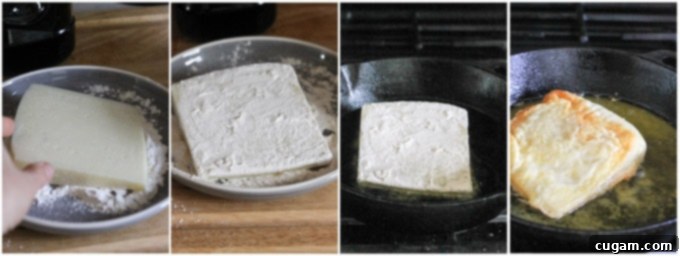
- Coat the Cheese (The Secret Step!): This is where the magic happens. Quickly submerge your cheese slice in the bowl of water, ensuring both sides are fully wet. Don’t let it sit in the water; just a quick dip is enough. Immediately transfer the wet cheese to the plate of flour and drench both sides thoroughly, pressing lightly to ensure the flour sticks. The water creates a thin film that allows the flour to adhere perfectly, forming the ideal coating for crispiness.
- Fry to Golden Perfection: Carefully place the flour-coated cheese onto the hot skillet. Resist the urge to move it! Let it fry undisturbed for about 2-3 minutes. You’re looking for a beautiful crispy, golden-brown crust to form on the bottom. Once it’s achieved that perfect color and texture, carefully flip it with a metal spatula and fry the other side for another 2-3 minutes, until equally golden and crispy. The cheese inside should be wonderfully soft and gooey.
- Serve Immediately with Lemon: As soon as both sides are golden and crispy, remove the Saganaki from the skillet and place it on a serving plate. The final, crucial step is to generously sprinkle the hot cheese with fresh lemon juice. The tartness of the lemon beautifully cuts through the richness and saltiness of the cheese, enhancing its flavor profile. Serve immediately, while it’s still sizzling hot. It pairs perfectly with fresh, crusty bread to soak up any melted goodness.


Essential Equipment for Making Greek Saganaki Cheese
One of the beauties of making Saganaki at home is that it requires very minimal and common kitchen equipment. You likely have most, if not all, of these items already! If not, they are simple to acquire and versatile for many other cooking endeavors. Here’s your checklist:
- Small Cast Iron Skillet: This is arguably the most important piece of equipment for Saganaki. Cast iron excels at retaining and distributing heat evenly, which is crucial for achieving that consistent golden-brown, crispy crust. A small skillet (around 6-8 inches) is ideal for frying one or two slices of cheese at a time, preventing overcrowding and ensuring optimal crispiness.
- Square or Round Bowl: A shallow bowl is perfect for quickly submerging your cheese in water, ensuring an even coating without the cheese soaking too much.
- Plate: A flat plate is needed for drenching the wet cheese in flour. A wide surface allows you to easily coat both sides thoroughly.
- Metal Spatula: A sturdy, thin-edged metal spatula is essential for flipping the cheese cleanly and for carefully removing it from the hot skillet once cooked. Its thin edge slides easily under the crispy crust without damaging it.
- Tongs (Optional but Recommended): While not strictly necessary, tongs can be helpful for handling the cheese, especially during the flouring process, to keep your hands clean.
- Serving Platter: A warm platter or individual plates will help keep the Saganaki hot for longer as you prepare to serve it immediately.
With these few simple tools and the technique outlined, you’re well on your way to enjoying delicious, homemade Saganaki.


Why You’ll Love Making Saganaki at Home
There’s a unique satisfaction that comes with recreating beloved restaurant dishes in your own kitchen, and Saganaki is no exception. Beyond the sheer deliciousness, here are a few reasons why this recipe will become a new favorite:
- Effortlessly Impressive: Despite its sophisticated appeal, Saganaki is incredibly easy to make. The simple process and quick cooking time mean you can whip up this impressive appetizer for guests or a weeknight treat with minimal fuss.
- Customizable Perfection: While Kefalograviera is the gold standard, you have the flexibility to experiment with other firm, salty cheeses to find your perfect match. You can also adjust the amount of lemon to suit your taste.
- The “Opa!” Moment (Optional): If you’re feeling adventurous, you can even attempt the traditional flambé, adding a dramatic flair to your serving. (Always exercise extreme caution and ensure proper ventilation if attempting flambé at home.) However, even without the fire, the sizzling cheese and fresh lemon are a showstopper.
- Instant Gratification: From prep to plate, Saganaki takes mere minutes to cook. It’s the ideal last-minute appetizer or snack when hunger strikes.
Be honest with me… Do you like fried cheese? If your answer is a resounding “yes,” then Saganaki is about to become your new obsession. Its crispy texture, rich flavor, and zesty lemon finish are simply irresistible.
Serving Suggestions for Your Homemade Saganaki
While Saganaki is perfect on its own, especially with a squeeze of lemon and a side of fresh, crusty bread for dipping, it also complements a variety of other dishes. Consider serving it as part of a larger mezze spread (Greek appetizer platter) alongside:
- Fresh olives and marinated artichoke hearts
- A simple Greek salad with ripe tomatoes, cucumber, red onion, and feta
- Traditional Greek dips like Melitzanosalata (Greek Eggplant Dip) or Tzatziki (Greek Cucumber Garlic Dip)
- Crisp white wine or a shot of ouzo for an authentic Greek experience
No matter how you choose to serve it, remember that Saganaki is best enjoyed immediately off the skillet, when it’s still warm and gloriously gooey.
Other Greek Recipes to Try
If you’ve fallen in love with the flavors of Greece, there’s a whole world of delicious cuisine waiting to be explored. Once you’ve mastered Saganaki, you may want to give any of these other awesome Greek recipes a try:
- Melitzanosalata – Greek Eggplant Dip
- Kolokitokeftedes – Greek Zucchini Fritters
- Spanakorizo – Greek Spinach Rice
- Kolokithopita – Greek Zucchini Pie
- Vegetarian Moussaka – Classic Greek Casserole
- Revithosoupa – Greek Chickpea Soup
- Fakes – Greek Lentil Soup
- Tzatziki – Greek Cucumber Garlic Dip

Saganaki Cheese (Greek Pan-Fried Cheese Recipe)
Print
Pin
Rate
Ingredients
- 1/2 lb Kefalograviera Cheese sliced to about 1/2 inch thickness
- 1/2 cup All-Purpose Flour
- 1 cup Water
- 2 tablespoons Extra Virgin Olive Oil
- 1 Lemon cut into wedges, for serving
- 1/2 cup Cherry Tomatoes for garnish (optional)
Instructions
-
Slice your Kefalograviera cheese into a 1/2-inch thick piece. Prepare your coating stations: a bowl with water and a plate with flour.
-
Heat your small cast iron skillet over medium-high heat. Add 2 tablespoons of extra virgin olive oil.
-
Quickly submerge the cheese in water, then immediately drench it in flour, ensuring both sides are fully coated.
-
Carefully place the coated cheese onto the hot skillet. Fry for 2-3 minutes until crispy and golden brown on the bottom. Flip and fry the other side for another 2-3 minutes.
-
Remove the Saganaki from the skillet. Immediately sprinkle with fresh lemon juice and serve hot, ideally with fresh bread.
Nutrition
Read about the author Edyta here or follow Eating European on social media: Facebook, Instagram, Pinterest, and Twitter.
