Ultimate Fluffy Overnight Orange Sweet Rolls with Zesty Cream Cheese Glaze
Prepare to be amazed by these incredibly soft, fluffy, and perfectly sweet orange rolls, complete with a luscious orange cream cheese glaze. This is more than just a recipe; it’s an experience, designed to bring bakery-quality goodness straight to your kitchen with the convenience of an overnight preparation. Yielding 12 delightful rolls, this recipe is a true showstopper for any breakfast or brunch gathering.
These orange sweet rolls have consistently been a cherished favorite among our readers ever since their initial publication in 2019. Recognizing their enduring popularity, we’ve meticulously updated this guide in April 2024 with brand new, vibrant photos and even more streamlined, step-by-step instructions. Our goal is to make your baking journey as smooth and enjoyable as possible, ensuring perfect results every time.
“The Best is right! I entered these Orange Rolls in my local county fair this summer and I WON a BLUE RIBBON FIRST PLACE for BEST SWEET ROLL! And they are THE BEST! Thank you for such delicious recipes!….⭐️⭐️⭐️⭐️⭐️
– Pamela
If the sheer delight of homemade orange rolls has eluded you until now, allow us to introduce you to these truly exceptional, bakery-worthy buns. In our family, these hold a special place alongside our beloved Banana Bread Cinnamon Rolls. We often find ourselves in a delightful dilemma, choosing between these citrusy spirals and our festive Cranberry Orange Almond Cake for our cherished Christmas morning breakfast. Their bright, zesty flavor is a welcome burst of sunshine, especially during colder months.

What sets this particular recipe apart is our meticulous use of fresh orange juice and zest, carefully incorporated into both the dough and the rich, aromatic filling. But there’s an even deeper layer to the incredible flavor profile of these rolls – a secret ingredient that truly makes the orange flavor POP in an unforgettable way. Can you guess what it might be? It’s GINGER. A touch of ground ginger elevates these to the absolute best orange rolls you will ever bake. This unexpected addition creates a harmonious balance, enhancing the citrus notes without overpowering them, resulting in a depth of flavor that will leave a lasting impression. These rolls are consistently soft, wonderfully fluffy, and truly perfect in every bite.
The beauty of an overnight orange roll recipe lies in its convenience, allowing you to prepare most of the work ahead of time. Imagine waking up, letting your dough have its final rise, and then baking a batch of warm, freshly glazed rolls with minimal effort on a busy morning. This makes them an ideal choice for holiday breakfasts, weekend brunches, or simply a luxurious treat to start your day.
[feast_advanced_jump_to]
Why These Orange Rolls Are Unquestionably The Best
There’s a reason these orange rolls consistently earn rave reviews and even blue ribbons. It’s a combination of carefully chosen ingredients and smart baking techniques that guarantee an exceptional result:
- Orange Zest Filling Stays Perfectly Inside! This is a common challenge with many sweet roll recipes – the delicious filling often oozes out during baking. However, we’ve cracked the code! Our trade secret, which we’ll happily reveal in the tips section below, ensures that every bit of that vibrant orange zest and sugary goodness remains nestled within each swirl, caramelizing beautifully as the rolls bake.
- Decadent Homemade Orange Cream Cheese Glaze: Forget thin, watery icings. Our homemade orange cream cheese glaze is rich, tangy, and incredibly smooth. It’s specifically crafted to complement the bright orange flavor of the rolls, adding a creamy, irresistible finish that is QUITE nice and makes each bite sing.
- Achieving Ultimate Softness and Fluffiness with Yeast: The magic of active dry yeast is paramount in this recipe. When properly activated and allowed to rise, it creates an incredibly soft, tender, and fluffy dough that practically melts in your mouth. This isn’t just about rising; it’s about developing the perfect texture that distinguishes truly great sweet rolls.
- Maximum Orange Flavor Infusion: We don’t just sprinkle a little orange flavor in. This recipe thoughtfully utilizes both fresh orange juice AND finely grated orange zest in the dough and the filling. This dual application ensures a deep, authentic, and vibrant orange flavor that permeates every layer of the roll, making it unmistakably citrusy and refreshing.
- The Subtle Power of the Secret Ingredient (Ginger): As mentioned, our secret ingredient is a whisper of ground ginger in the filling. This isn’t enough to make the rolls taste like ginger, but rather just enough to amplify and brighten the natural orange notes, adding a layer of complexity and warmth that is simply amazing and never overpowering. It’s the subtle touch that makes all the difference.
- Trusted by Bakers Everywhere: With dozens of 5-star reviews from fellow home bakers, you can be confident that you’re investing your time and ingredients into a tried-and-true recipe that consistently delivers delicious results. Join the chorus of happy bakers who have made these their go-to orange rolls!
🛒 Essential Key Ingredients for Perfect Orange Rolls
Crafting the best orange rolls starts with high-quality ingredients. Here’s a closer look at what you’ll need and why each component is crucial:
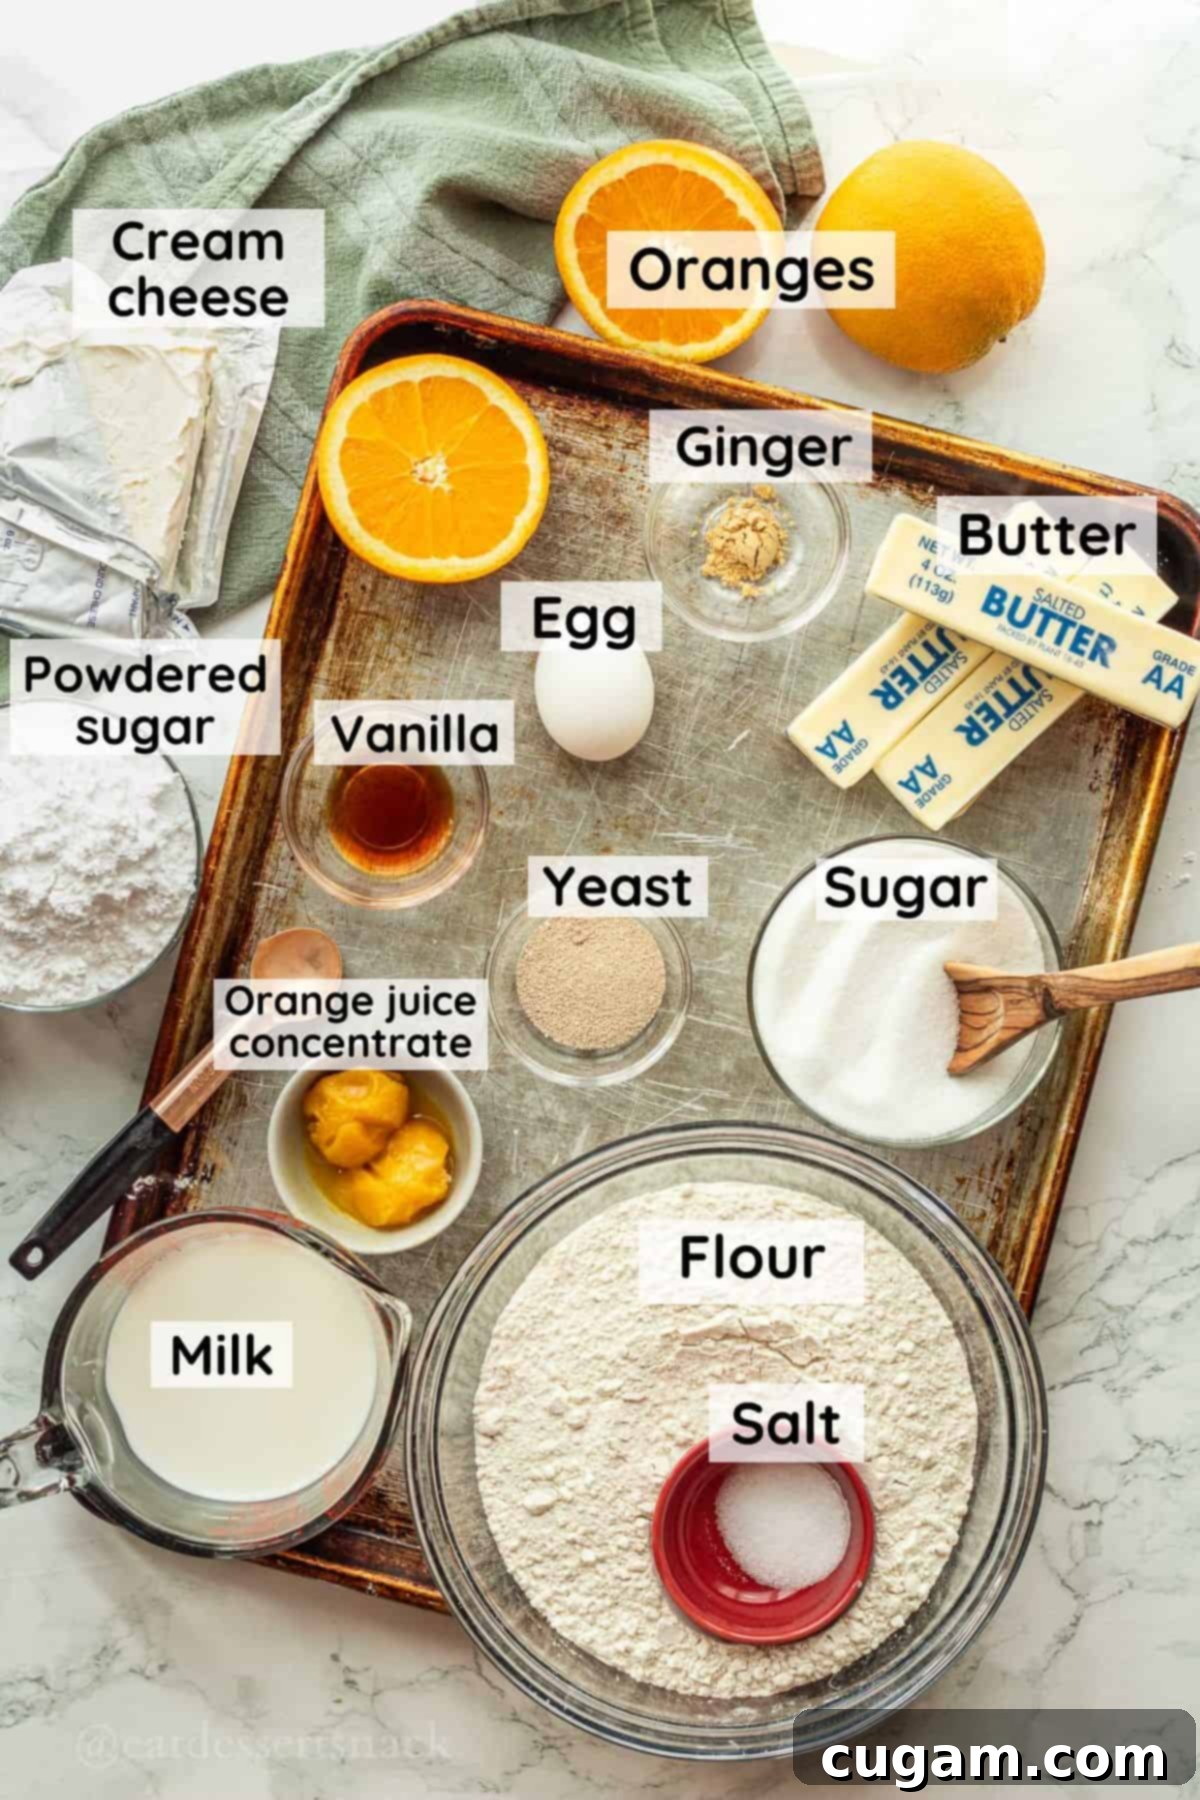
- Oranges: Freshness is key here! We recommend using regular navel oranges for their sweet flavor and abundant zest. You’ll need at least two oranges for the dough and filling, but consider having a third on hand if you love extra zest sprinkled over the finished rolls. A little trick: after zesting, slice the remaining orange to serve alongside your baked rolls for an elegant touch.
- Ginger: This is our “secret weapon” for the filling! Don’t be afraid; the ground ginger is not meant to overpower the orange. Instead, it subtly enhances and brightens the citrus notes, adding a unique warmth and depth that truly sets these rolls apart. It’s a nuanced flavor that makes people wonder what your special touch is.
- Orange Juice Concentrate: While fresh juice is in the dough, for the glaze, frozen orange juice concentrate is a game-changer. It provides an intense, vibrant orange flavor and a beautiful color to the cream cheese glaze, making it truly exceptional. Look for it in the freezer aisle.
- Active Dry Yeast: This is what gives our rolls their incredible light and airy texture. While active dry yeast needs to be proofed (activated in warm liquid), instant yeast can also be used for a slightly faster rise time. Just ensure your yeast is fresh and active for the best rise.
- Butter: We highly recommend using salted butter in this recipe for the best flavor balance. The touch of salt enhances all the other flavors, making the rolls taste richer and more satisfying. If you’re managing sodium intake, unsalted butter can be used, but you might want to slightly increase the salt in the dough. Ensure it’s softened for both the dough and the filling for optimal incorporation.
- Egg: A single large egg acts as a binder in the dough, contributing to its structure, richness, and beautiful golden color. It also helps in keeping the rolls moist and tender.
- Milk: Using whole or 2% milk is crucial for enriching the dough. The fat content in the milk contributes to the dough’s softness, tenderness, and fluffy texture, ensuring that your rolls remain delightful even the next day. Warm milk is also essential for activating the yeast.
- All-Purpose Flour: The foundation of our dough. While this recipe specifies 4 cups, keep an extra ½ cup on hand. The exact amount can vary slightly depending on humidity and how you measure your flour. The goal is a dough that’s smooth, elastic, and only slightly sticky.
✏️ Smart Substitutions for Your Orange Rolls
Life happens, and sometimes you need to adapt a recipe. Here are some thoughtful substitutions that can help you customize your orange rolls without compromising too much on flavor or texture:
- Ginger: If ginger isn’t your preference or you don’t have it on hand, you can replace it with an equal amount of cinnamon. This will create a delightful cinnamon-orange flavor profile, shifting towards a classic cinnamon roll taste with an orange twist.
- White Granulated Sugar: For those looking for an alternative, white granulated sugar can be successfully replaced with coconut sugar. Coconut sugar will impart a slightly richer, more caramel-like note and a subtly darker color to the rolls and filling.
- Milk: If you have dietary restrictions or simply prefer it, regular milk can be replaced with an unsweetened nut milk, such as almond milk or oat milk. Be aware that this might slightly alter the richness and texture of the dough, making it a bit less tender, but the rolls will still be delicious.
🆒 Creative Variations to Elevate Your Sweet Rolls
Once you’ve mastered the classic orange roll, feel free to get creative with these delicious variations:
- Lemon Love: For a tangy twist, substitute lemons in place of all the orange zest and orange juice. A bright lemon cream cheese glaze would be an amazing complement to these zesty rolls!
- Cranberry Orange Delight: Add 1 cup of chopped dried cranberries to the filling mixture for a festive cranberry-orange version, perfect for holidays or a cozy winter brunch.
- Nutty Texture: If you enjoy a little crunch, fold in 1 cup of finely chopped walnuts or pecans to the filling along with the sugar mixture.
- Almond Infusion: For a subtly different aromatic profile, add ½ teaspoon of almond extract to the icing. It pairs beautifully with citrus flavors.
- Spiced Orange Rolls: Consider adding a pinch of cardamom or a tiny dash of nutmeg along with the ginger in the filling for an even more complex spice blend.
🧑🍳 Step-by-Step Instructions for Irresistible Orange Rolls
Follow these detailed steps carefully to achieve perfectly soft, fluffy, and flavorful orange rolls with our signature zesty glaze.
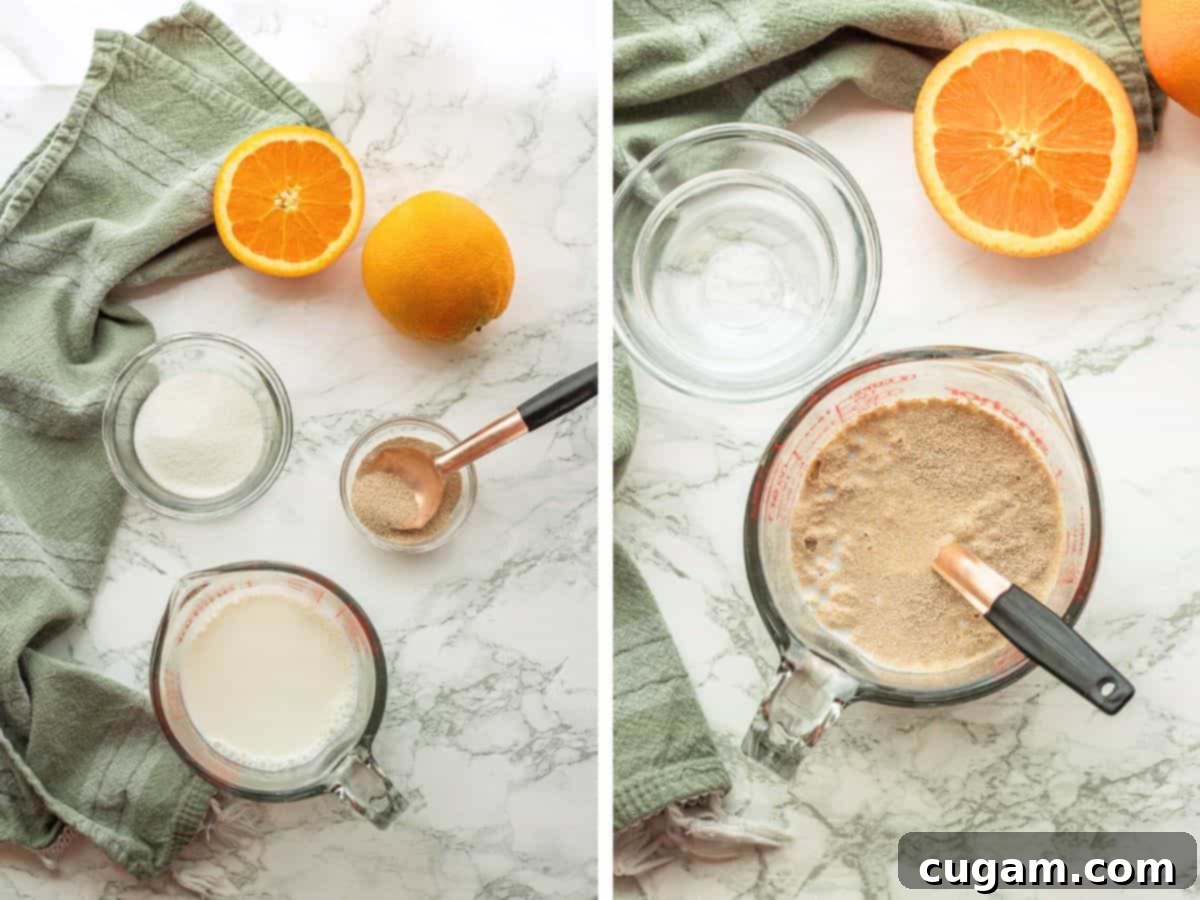
Dough Preparation – Step 1 (Activating the Yeast): In a small bowl, combine your warm milk (aim for a temperature between 100-110 ℉ – it should feel comfortably warm to the touch, not hot), granulated sugar, and active dry yeast. Give it a gentle stir. Let this mixture sit undisturbed for about 5-10 minutes, or until it becomes noticeably foamy and bubbly. This foam is a sign that your yeast is alive and active! If your milk is too hot, it will kill the yeast, preventing the dough from rising, so temperature is crucial here. If after 10 minutes there’s no foam, your yeast might be expired, or the milk was too hot/cold; you’ll need to start again with fresh yeast.
💡 Quick Tip for Instant Yeast: If you’re using instant yeast (which doesn’t require proofing), you can simply combine all dough ingredients directly. However, always remember to keep the yeast away from direct contact with the salt when initially combining ingredients, as salt can slow down yeast growth.
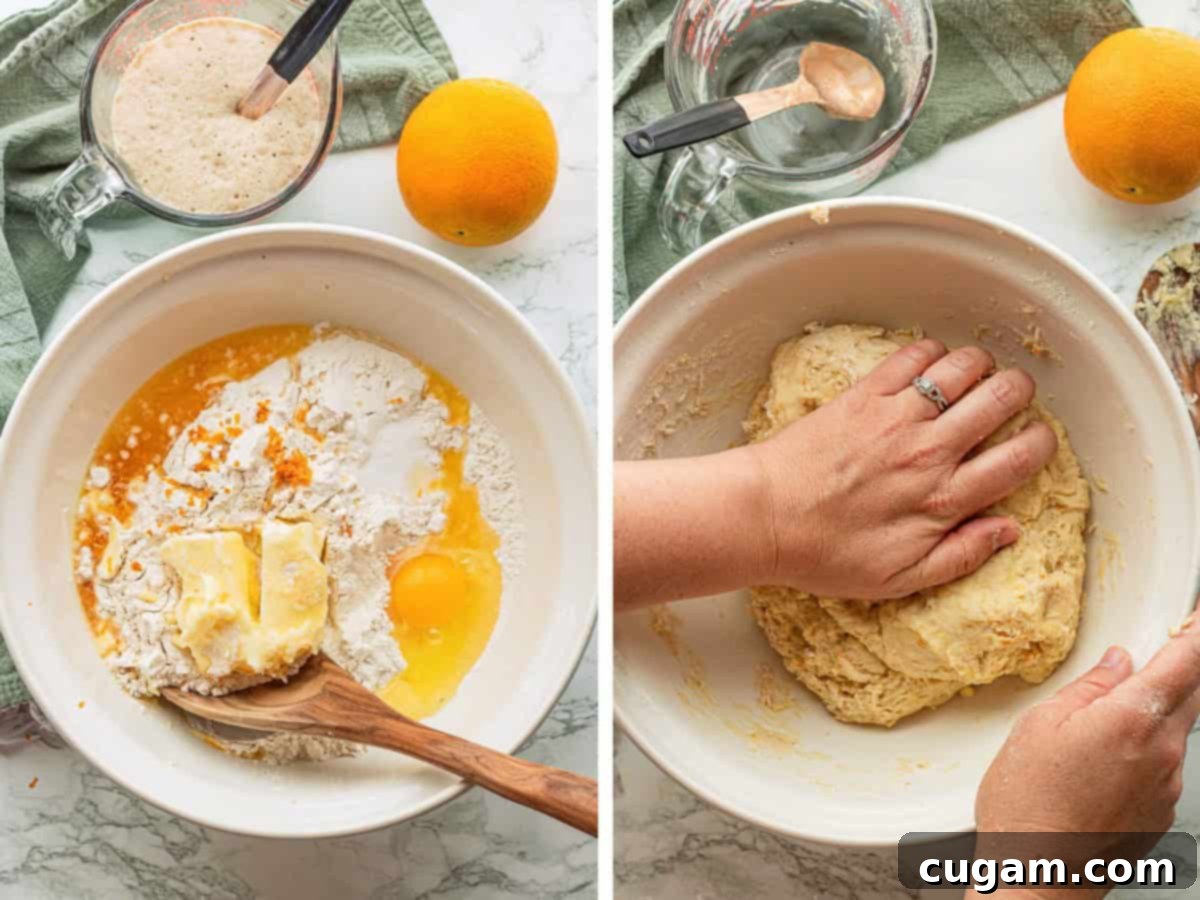
Dough Preparation – Step 2 (Mixing the Dough): In the bowl of a stand mixer fitted with a dough hook (or a large mixing bowl if you’re kneading by hand), combine the salt, softened butter, egg, fragrant orange zest, fresh orange juice, and 4 cups of all-purpose flour. Once your yeast mixture is foamy, pour it into the bowl with the other ingredients. Mix with the dough hook on low speed for 5-8 minutes until the dough becomes smooth, elastic, and pulls away from the sides of the bowl. If you’re mixing by hand, stir with a sturdy wooden spoon until the dough is too stiff to mix, then turn it out onto a lightly floured surface and knead by hand for 8-10 minutes, developing its gluten. The dough should feel supple and springy.
Dough Preparation – Step 3 (First Rise): After mixing, gradually add up to another ½ cup of flour, if needed, until the dough consistency is only slightly sticky. It should still be soft but manageable, easily pulling away from the sides of the bowl in an electric mixer. Lightly oil a large clean bowl. Place the dough inside, turning it once to coat all sides with oil. Cover the bowl tightly with plastic wrap or a clean kitchen towel. Allow the dough to rise in a warm, draft-free room temperature environment for approximately one hour, or until it has visibly doubled in size. This first rise is crucial for flavor development and texture.
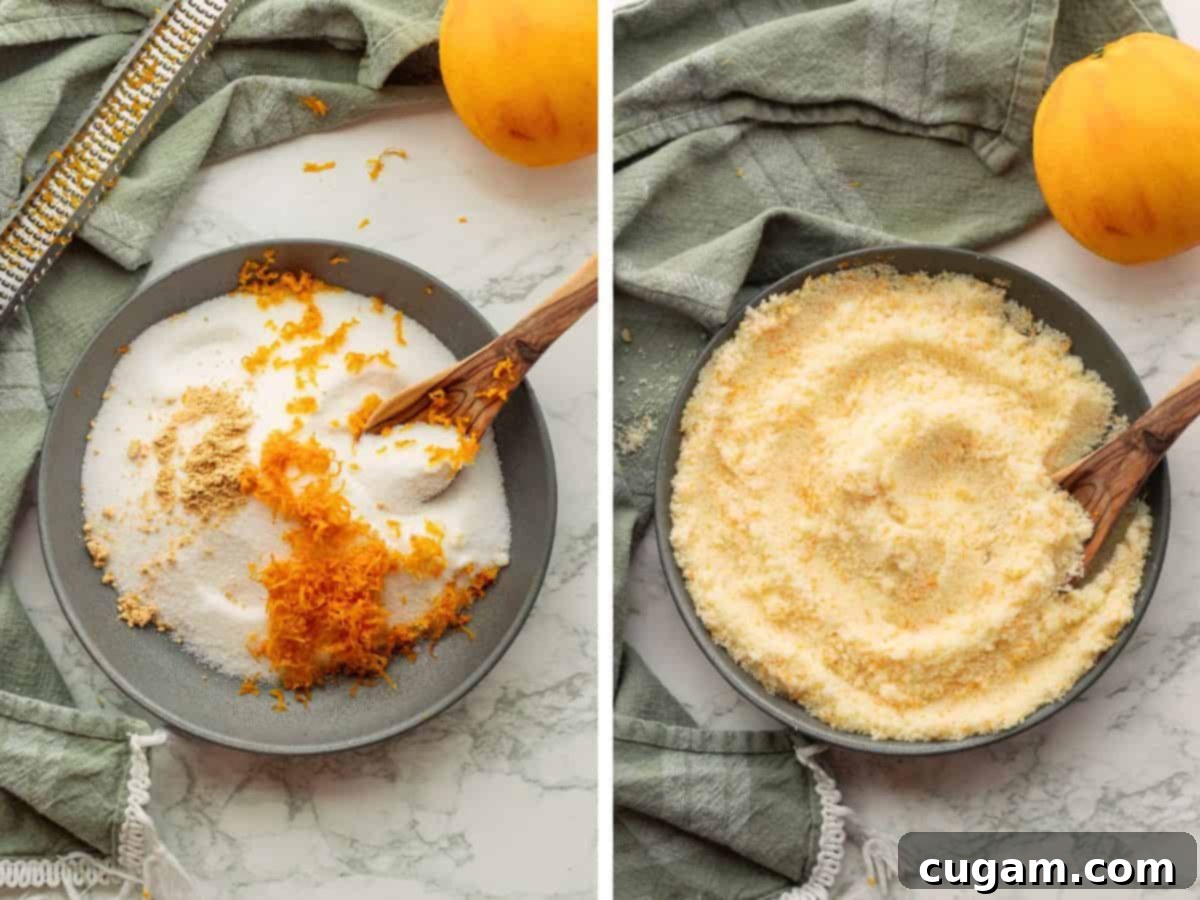
Creating the Zesty Filling – Step 1: While your dough is rising, prepare the incredibly aromatic filling. In a medium bowl, combine the granulated sugar, fresh orange zest, and that secret ingredient – ground ginger. Mix these ingredients together thoroughly, using your fingers to really rub the orange zest into the sugar for a minute or two. This action helps release the essential oils from the zest, infusing the sugar with a deeper orange flavor and turning it a lovely light orange color. Finally, mix in the ¼ cup of all-purpose flour. Set this vibrant mixture aside.
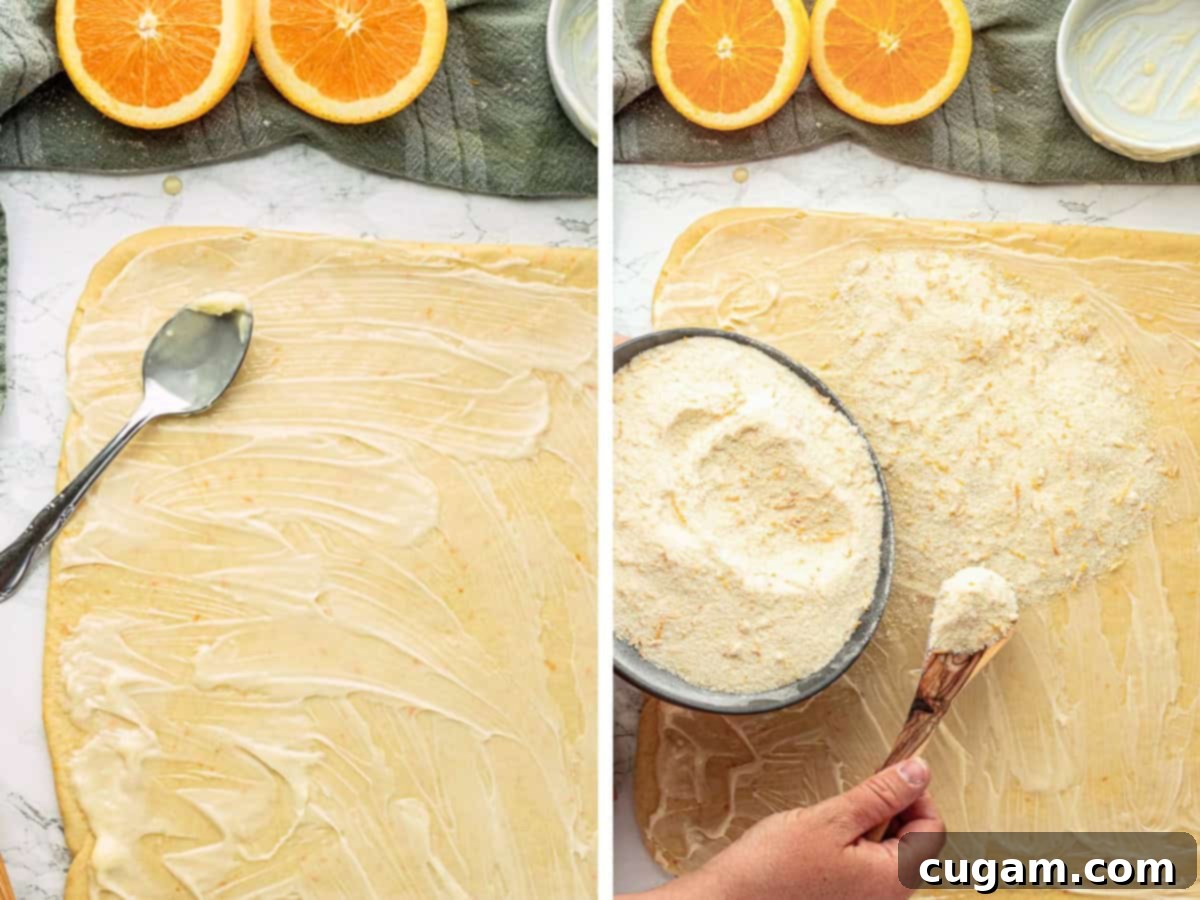
Assembling the Rolls – Step 2 (Rolling and Spreading): Once your dough has doubled, gently punch it down to release the air. Transfer the dough to a lightly floured work surface. Using a rolling pin, roll the dough out into a large rectangle, approximately 24 inches long by 12 inches wide. Don’t worry if it’s not perfectly rectangular; you can gently shape it with your hands as you go. Next, evenly spread the ½ cup of softened butter over the entire surface of the dough, leaving a small ½-inch border along one of the long edges. Then, generously sprinkle and spread the prepared orange sugar mixture evenly over the buttered dough.
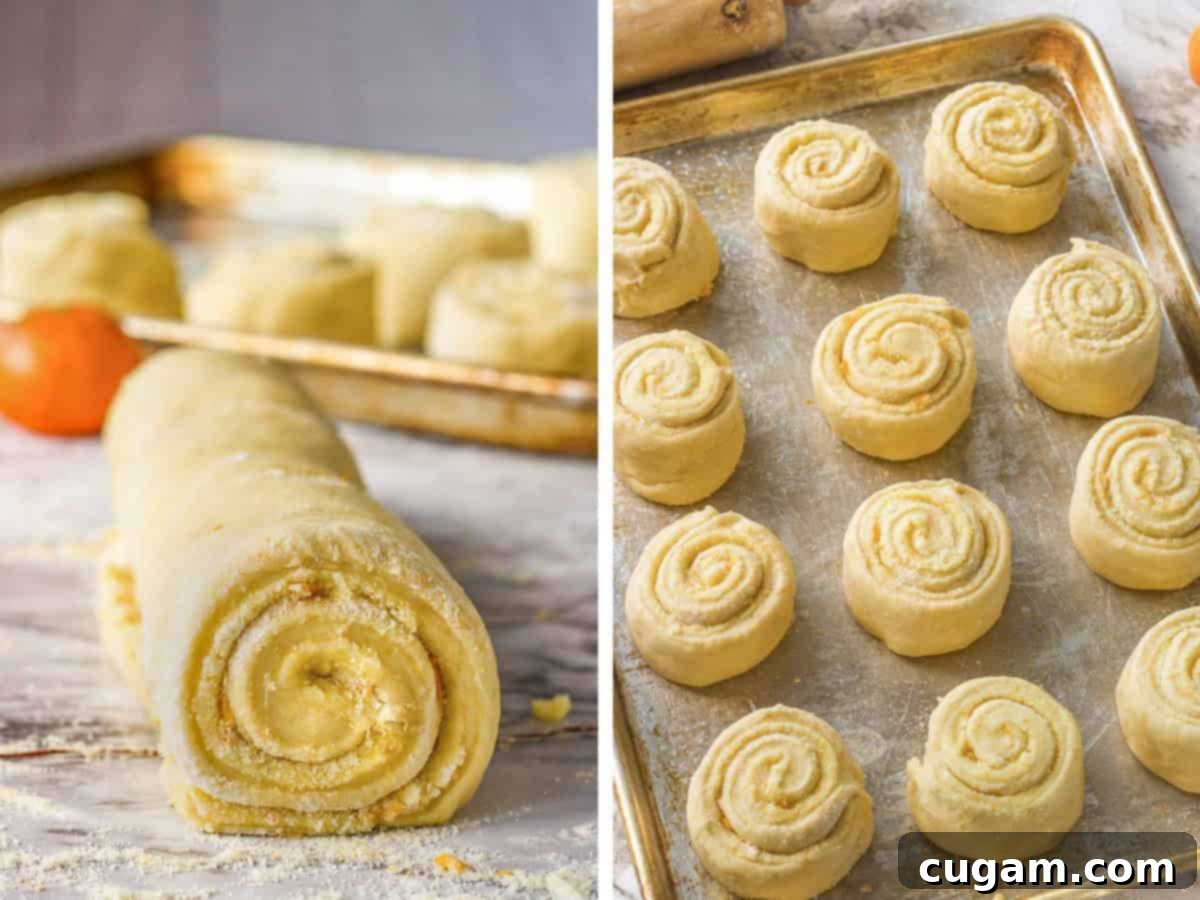
Assembling the Rolls – Step 3 (Rolling the Log): Starting from one of the long edges (the one without the butter-free border), carefully and tightly roll the dough lengthwise into a snug, long log. Try to keep the roll as even as possible to ensure uniform slices.
Assembling the Rolls – Step 4 (Cutting and Arranging): To cut the dough into perfectly even pieces without flattening them, use a piece of clean, unflavored dental floss or a thin piece of kitchen string. Slide the string underneath the rolled log. Pick up both ends of the string, cross them over the top, and pull tightly to cut the dough into 12 equal pieces. This method creates clean, defined spirals. Lightly oil a 9×13 inch baking pan or a large 18×11 inch baking sheet. Place the cut rolls, cut-side down, into the prepared pan. If using the smaller 9×13 pan, the rolls will be closer together, which can result in a slightly longer baking time but often yields a moister roll. On a larger baking sheet, they may bake a bit faster and have crispier edges.
Assembling the Rolls – Step 5 (Second Rise & Baking): Cover the pan with a clean dish towel and let the rolls rise in a warm place for 45 minutes to one hour, or until they have almost doubled in size and look visibly puffy. While they are rising, preheat your oven to 350 ℉ (175°C). Once risen, bake the rolls for 25-30 minutes, or until their tops are light golden brown and they are cooked through. Baking times can vary: rolls in a glass or thick ceramic pan may take a little longer, while those in a dark metal pan or on a large baking sheet might bake more quickly. Keep an eye on them towards the end. Once baked, remove from the oven and let them cool for 10-15 minutes before glazing.
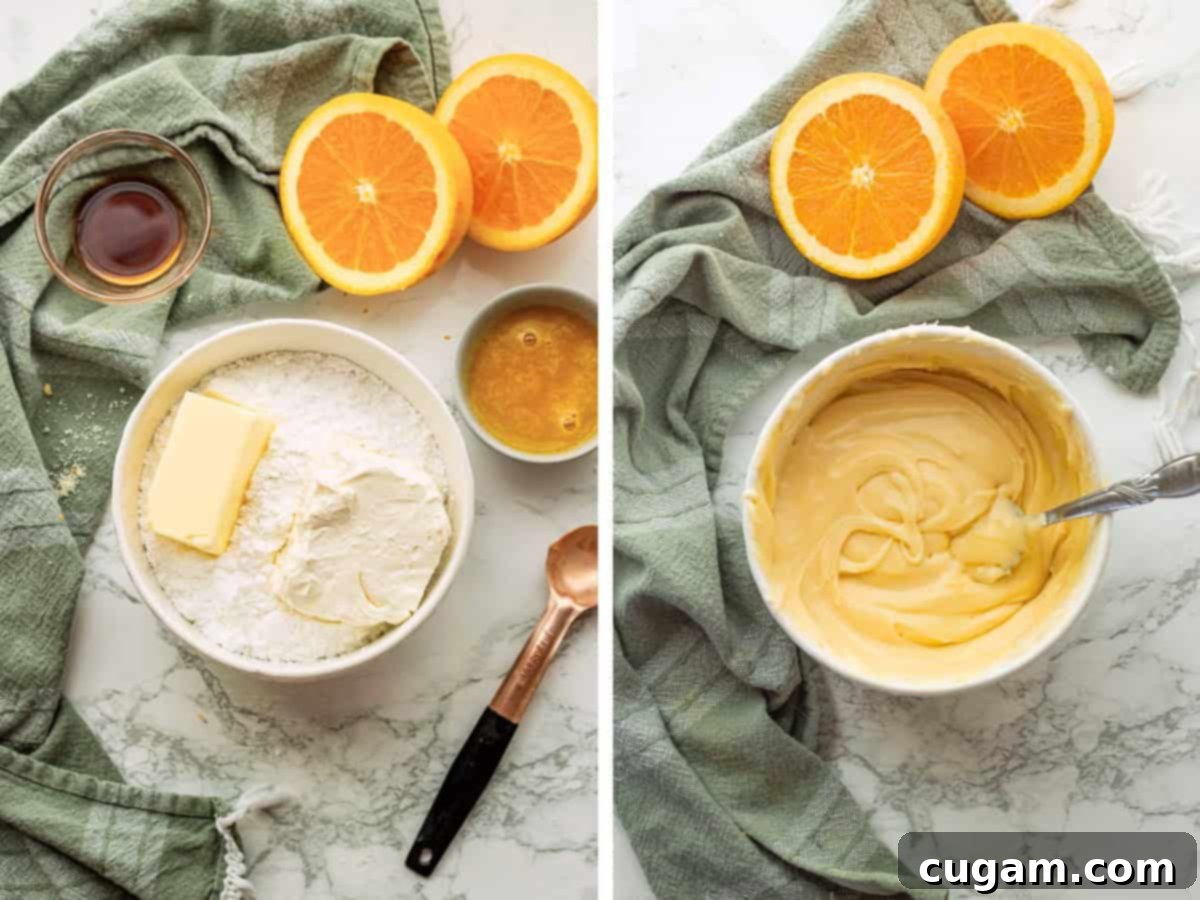
Crafting the Luscious Orange Cream Cheese Glaze: In a medium-sized mixing bowl, combine the softened cream cheese and softened butter. Beat them together until the mixture is mostly smooth and any lumps are gone. For easier mixing, you can microwave the cream cheese and butter for 10-20 seconds to soften them further. Next, add the powdered sugar, vanilla extract, and the star ingredient – frozen orange juice concentrate. Mix everything until the glaze is completely smooth and creamy. We prefer a thicker, frosting-like consistency for our glaze, which generously coats each roll. If you desire a thinner glaze, simply add another 1-2 tablespoons of orange juice concentrate, one tablespoon at a time, until you reach your preferred drizzly consistency.
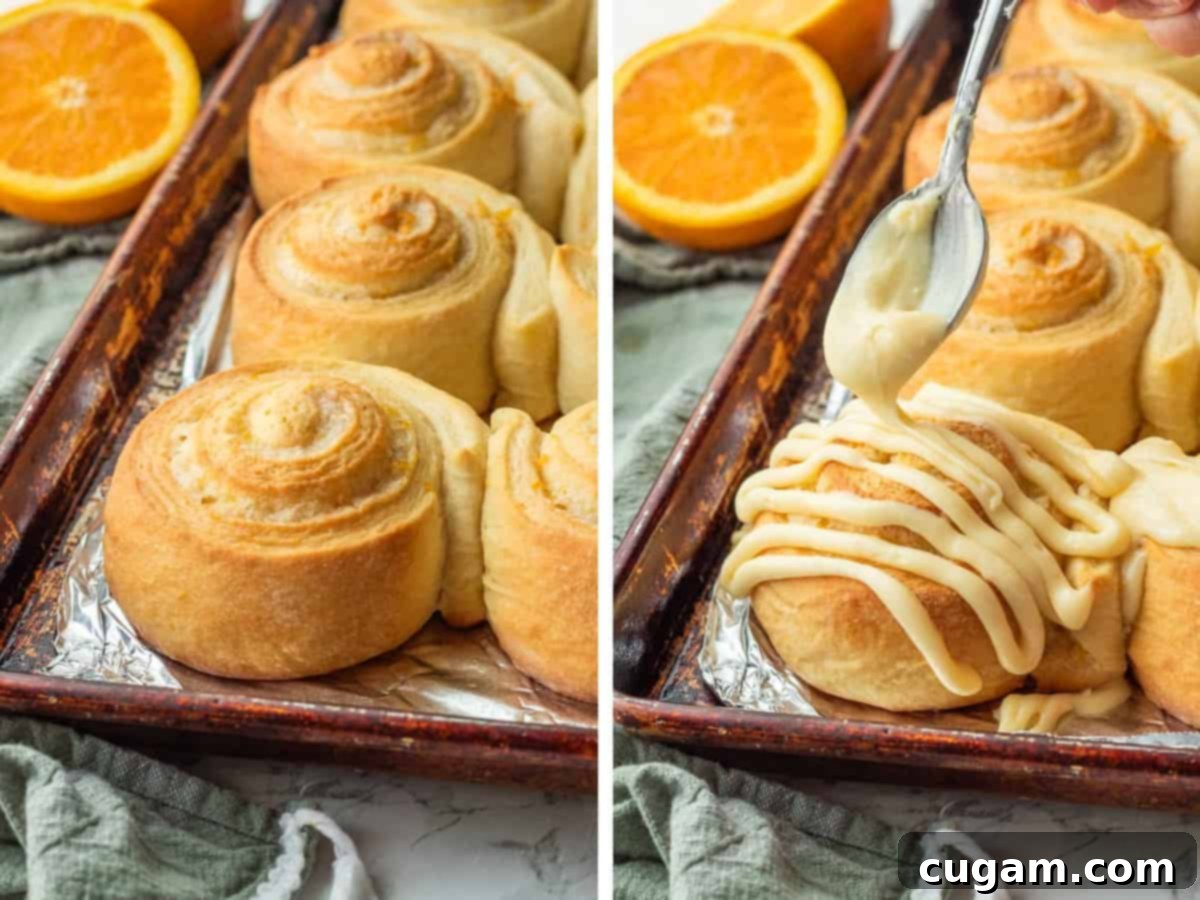
Once your irresistible orange buns emerge from the oven, allow them to cool in the pan for about 10-15 minutes. This cooling period is important as it allows the rolls to set slightly and absorb the glaze without it melting completely. After this brief cooling time, generously drizzle or spread the prepared orange cream cheese icing over the warm rolls. Serve them warm for maximum deliciousness – the combination of warm roll and cool, tangy glaze is heavenly. Instructions for making these wonderful orange rolls overnight are conveniently located in the Frequently Asked Question section below!
📌 Top Tips for Perfect Orange Sweet Rolls
Achieving bakery-level orange rolls is easy with these expert tips:
- Choose the Right Milk: Always use 2% or whole milk in your dough. The higher fat content enriches the dough, working in harmony with the egg and butter to create rolls that are exceptionally soft, tender, and remain fresh and delicious even the next morning. Skimping on fat here will result in drier, less satisfying rolls.
- Embrace the Ginger: Don’t skip the ground ginger (our secret ingredient) in the filling! This subtle addition seriously lifts these rolls to a whole new level of flavor, adding an unexpected warmth and depth that complements the orange beautifully without tasting overtly “gingery.” Trust us on this one – it’s a game-changer.
- Respect the Rise Time: We cannot stress this enough – do not skimp on rising time! Allowing the dough to fully rise, both during the first and second proof, is absolutely essential for developing the best flavor and achieving that signature light, airy, and fluffy texture. Patience here truly makes a significant difference in the final product.
- My Bakery Style Trick: Keep the Filling Inside! The secret to preventing that delightful orange zest and sugar filling from oozing out and burning in the bottom of your pan as the rolls bake is simple: a small amount of flour mixed into the filling. This flour acts as a thickener, creating a beautifully contained, caramelized orange goodness within each swirl as the butter and sugar melt.
- Frozen Concentrate for the Win: For an extra orangey kick and a vibrant flavor in your frosting, always use frozen orange juice concentrate. Its intense, concentrated flavor surpasses fresh juice for glaze purposes, giving you a brighter, more pronounced orange taste that is simply irresistible.
- Simplify Juicing with a Tool: Make quick work of extracting the fresh orange juice you need for the dough by using an orange juicer. As a general guide, one medium orange typically yields about ¼ cup of juice.
❓Frequently Asked Questions About Orange Rolls
Yes, absolutely! Making orange rolls overnight is a fantastic way to enjoy fresh rolls with minimal morning effort. Here’s how:
– Follow the recipe instructions to make the dough, allow it to complete its first rise, then prepare the filling, roll out the dough, fill, roll into a log, and cut the dough into 12 individual rolls. Place these cut rolls, cut-side down, into your oiled baking sheet or 9×13 inch pan.
– Crucially, cover the pan tightly with plastic wrap and refrigerate immediately. Do not let the rolls undergo their second rise before refrigerating, or they will deflate in the refrigerator due to over-proofing. The cold temperature simply slows down the yeast’s activity; it doesn’t kill it.
– Place the covered pan in the fridge overnight (up to 12-18 hours).
– The next morning, remove the pan from the refrigerator and let the rolls warm up and rise in a warm place for 30-40 minutes, or until they are almost doubled in size and look puffy. A great trick is to turn on your oven to 200°F (95°C) for just 2 minutes, then immediately turn off the oven. Place the rolls inside the slightly warm oven with the door cracked open to create a perfect environment for rising.
– Once risen, bake at 350°F (175°C) for 25-30 minutes. Remember that glass pans often take a few more minutes to bake than dark metal pans.
Freezing orange sweet rolls is a great way to enjoy them later! You can freeze them either baked or unbaked:
If baked: Allow the rolls to cool completely on a wire rack after baking and glazing. Once fully cooled, wrap them very well in plastic wrap and then aluminum foil to prevent freezer burn. Store them in the freezer in an airtight container for up to 1 month. To reheat, thaw overnight in the refrigerator, then warm in a 350°F (175°C) oven for 10-15 minutes, covered with foil, or briefly in the microwave.
If unbaked (preferred for best freshness): As soon as the rolls are assembled and sliced, arrange them in a pan (leaving a little space between them if possible), cover tightly with plastic wrap, and freeze immediately. Do not let them rise before freezing, as they will deflate in the freezer.
– Once the rolls are solidly frozen, you can transfer them to a freezer bag or a smaller freezer-safe container to save space. Label with the date.
– Freeze until ready to use, up to 3 months. Do NOT microwave the frozen dough to thaw, as this will kill the yeast, and the rolls won’t rise properly.
• Regular rise method (from frozen): Remove the frozen rolls from the freezer, place them in your baking pan, and cover them loosely with plastic wrap or a dish towel. Let them thaw and rise in a warm place for 3-5 hours, or until they have almost doubled in size.
• Quicker rise method (from frozen): Turn ON your oven to 200°F (95°C) for 2 minutes, then immediately turn OFF the oven. Place the covered rolls in the slightly warm oven and let them thaw and rise for 2-3 hours until almost doubled in size.
– Once risen, bake at 350°F (175°C) for 25-30 minutes, or until golden brown. Adjust baking time based on your pan type.
This particular recipe for orange rolls does NOT include cinnamon, and we believe it doesn’t need it! Our recipe focuses on maximizing the pure, vibrant flavor of fresh orange in both the dough, with the subtle enhancement of ginger in the filling, and in the delightful orange cream cheese frosting. Typically, when you see “orange cinnamon rolls,” those usually feature a traditional cinnamon filling paired with an orange-flavored frosting. Ours is a distinct, purely orange-centric experience.
Reheating orange rolls properly will help restore their fresh-baked goodness:
Oven Method: For the best results, cover the rolls loosely with aluminum foil and place them in a 350 ℉ (175°C) preheated oven. Heat for 10-15 minutes, or until warmed through. The foil prevents them from drying out.
Microwave Method: If you’re in a hurry and just reheating one or two rolls, place them on a microwave-safe plate and microwave for about 30-45 seconds. Be careful not to overheat, as they can become tough.
If the rolls have been frozen, make sure to let them thaw completely at room temperature overnight before attempting to reheat them using either of the methods above.
For the absolute best results, yes, allowing the dough to rise twice is highly recommended. The first rise (bulk fermentation) allows the yeast to work its magic, developing deep flavors and creating a strong gluten structure. The second rise (proof) gives the individual rolls their characteristic light, airy, and fluffy texture with a finer, more tender crumb. Skipping the second rise would result in denser, less flavorful rolls. The longer the yeast ferments (within reason), the more complex and delicious the dough will be.
We strongly advise against leaving the salt out of the dough. Salt plays several critical roles in baking yeast breads: it significantly impacts the overall flavor, balancing the sweetness and enhancing the other ingredients. Additionally, salt helps to control yeast growth, preventing the dough from over-rising too quickly and contributing to a better crumb structure. If you leave salt out, the dough will likely rise slightly more rapidly, but the resulting rolls will lack depth of flavor and may have an inferior texture.
More Delicious Sweet Treats to Try
If you loved these orange sweet rolls, you’re sure to enjoy these other delightful recipes perfect for breakfast, brunch, or dessert!
- Banana Bread Cinnamon Rolls
- Carrot Cake Cinnamon Rolls
- Pumpkin Cinnamon Rolls
- Cranberry Orange Coffee Cake
Did you try this recipe? If you loved these ultimate orange sweet rolls, please consider leaving a ⭐️ star rating and a comment below the recipe card. Your feedback is incredibly valuable to us and immensely helpful to other readers looking for delicious new recipes!
📲 FOLLOW Sara on Social! 👋 Stay connected and see the latest sweet and savory creations from our kitchen! Find us on Facebook, Instagram, or Pinterest.
📝 Printable Recipe

Best Orange Rolls Recipe
Pin Recipe
Ingredients
- 1 cup milk
- ¼ cup granulated white sugar
- 1 Tablespoon active dry yeast
- 1 teaspoon salt
- ½ cup butter, softened
- 1 egg
- 2 teaspoons orange zest (of one orange)
- ¼ cup fresh orange juice (of one orange)
- 4 cups all purpose flour (plus extra for rolling out)
Filling:
- 1 cup sugar
- 2 teaspoons zest (of one orange)
- ½ teaspoon ground ginger
- ½ cup butter
- ¼ cup all purpose flour
Frosting:
- 4 oz cream cheese, softened
- 4 oz (½ stick) butter, softened
- ½ teaspoon vanilla
- 2 Tablespoons frozen orange juice concentrate
- 2 cups powdered sugar
Instructions
-
In a small bowl combine warm milk (between 100-110 F) sugar, and active dry yeast and let sit 5 minutes or until foamy. If using instant yeast, simply combine all dough ingredients. Just keep the yeast away from direct contact with the salt when combining ingredients (salt slows yeast growth).
-
In a stand mixer (or large bowl if mixing by hand) combine salt, butter, egg, orange zest, orange juice, and 4 cups of flour. Pour foamy yeast mixture in and mix with dough hook on low speed for 5-8 minutes until smooth and elastic (if mixing without a mixer, simply mix with a wooden spoon until you can’t mix anymore and then begin kneading by hand 8-10 minutes).
-
Add up to another ½ cup of flour to make dough consistency only slightly sticky. Dough should pull away from sides of bowl. Oil a large bowl, place dough inside and cover with plastic wrap. Let rise at room temperature for one hour or until doubled in size.
For Filling:
-
In a medium bowl combine sugar, orange zest and ground ginger. Mix in the orange zest for a minute or two so that the sugar turns orange, then mix in the flour. Set aside.
-
On a floured work surface, roll dough into roughly a 24 inch by 10-12 inch rectangle. I stop occasionally and shape it with my hands to keep a rectangular shape. Spread softened butter over dough. Sprinkle and spread sugar mixture evenly over butter.
-
Carefully roll dough lengthwise into a long roll.
-
Use a piece of clean string or dental floss and slide the string underneath the roll. Pick up both ends of the string, cross them, and pull tight to cut the dough into 12 equal pieces. Place rolls cut side down into an oiled 9×13 inch pan or large baking sheet, being careful not to crowd the rolls so they have room to rise.
-
Cover with a dish towel, and let rise for 45 minutes to one hour until almost doubled in size.Preheat oven to 350 F. Bake for 25-30 minutes, until light golden brown on top. Using a glass or dark pan may take more or less time. Cool 15-20 minute before icing.
For the Icing:
-
In a medium bowl combine cream cheese, butter and mix until most of the lumps are gone. I microwave them for 10-20 seconds to soften them enough to mix. Mix in powdered sugar, vanilla, and orange juice concentrate until smooth. I like my icing thicker like frosting. Add another 1-2 Tablespoons orange juice concentrate if you prefer a thinner glaze. Generously spoon icing over rolls to coat evenly. Serve warm for maximum deliciousness.
Notes
Follow directions to make dough, let rise once, fill, roll, and cut dough into individual rolls and place into pan, and cover with plastic wrap. Refrigerate immediately.
Do not let the individual rolls rise (the second rise) or they will deflate in the refrigerator.
Place in fridge overnight. Remove and let rise for 30-40 minutes in warm place before baking.
Bake at 350 for 25-30 minutes.
Freezer Instructions:
Follow directions to make dough, let rise once, fill, roll, and cut dough into individual rolls and place into pan, so edges are not touching, and cover with plastic wrap. Freeze immediately.
Do not let the cut rolls rise or they will deflate in the freezer. Once frozen, transfer to freezer bag or container. Freeze until ready to use up to 3 months.
Regular thawing method: Remove from freezer, place on baking sheet, cover in plastic wrap and thaw in warm place covered for 3-5 hours or until almost doubled in size.
Quicker method: Turn ON oven to 200 degrees for 2 minutes then turn OFF. Place rolls in oven and let thaw and rise covered with plastic wrap for 2-3 hours until almost doubled in size.
Bake at 350 for 25-30 minutes.
Nutrition

Hi, I’m Sara!
Registered Nurse by day, food blogger by weekend. A perfect dip tester & snack quester. I find joy in short walks on the beach and indulging in long naps. Passionately sharing my love for food, one delightful bite at a time.
